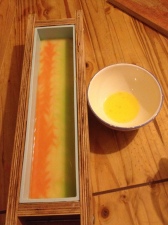
I’ve been on a bit of a self imposed soaping break recently, in preparation for ‘The Big Move’, and it feels like ages since I last made soap. When Amy of Great Cakes Soapworks posted this month’s soaping challenge – the beautiful Taiwan Swirl – I decided to sign up just to watch the tutorial and see how it’s done. Anyhow, watching the video got me itching to make soap again, so, at the eleventh hour, I unpacked all the soaping gear (to raised eyebrows from my other half :-D) and gave it a shot.
The Taiwan Swirl calls for a really really thin soap batter, which I knew would be my first challenge. My usual recipe traces fairly quickly and wouldn’t be any good for this design. Amy suggested 80% Olive oil to 20% Coconut oil, so I ran that through SoapCalc and decided I’d like the final soap to be a bit more bubbly. I plumped for 70% Olive oil, 20% Coconut oil and 10% Castor oil. Some of you will have spotted the obvious mistake already – guess who totally forgot that Castor oil can speed up trace?
I mixed up a blend of Lemon, Clary Sage and Ginger essential oils to fragrance the soap, and chose what I hoped would be complementary green and orange micas for the colours. I dispersed the micas in about 15ml of Olive oil:
I had already made up the lye solution and melted/mixed the oils earlier in the day, so I had both at room temperature. I added the lye to the oils and briefly mixed with the stick blender to the point of a very VERY light trace. Amy, in her video, suggested stopping as soon as the batter was emulsified and just before it traced, but I missed that window and definitely hit trace 🙂 I poured a very small amount (just over 100ml from a 750g batch) of batter into each jug of mica and poured the remaining batter into the mould. I knew I was running out of time as the batter in the mould was thickening so I quickly poured the coloured mixes into the base (from high, to get the colour down through the batter to the base – one down one side, lengthways, and the other down the other side). Both were poured at the same time, which proved challenging!
Then I swirled, using a skewer. The swirling is a bit difficult to explain without a diagram but here goes: Put the skewer into the mould, right down to the base, in one corner of the mould then make tight ‘s’ shapes from one short end of the mould, side to side down the length of the mould to the other short end. Then, keeping the skewer in the mould, make long ‘s’ shapes along the length of the mould – at 90 degrees to the first ‘s’ shapes. I hope that makes sense but if not there are some great YouTube tutorials on my Pinterest board here.
Anyone spot the next obvious mistake? Yup, I forgot to add the essential oil blend. Ah well, too late to do anything about it :-s
 At this stage I was a little bit disappointed with what was in the mould – the swirls weren’t as fine as I’d hoped, and the green colour wasn’t very defined, but by the next morning it was looking better, and by the time I cut it I was pretty happy with the result….
It’s still pretty soft – I’ve never made a soap with such a high percentage of liquid oils before – and I think it’s going to need a good long cure time to get nice and hard. I really should have left it for at least 48 hours before cutting, rather than my normal 24 hours, but I was in a hurry to get this post finished, and a picture uploaded onto to Amy’s challenge web page before the deadline, so that’s what I’m off to do now 😀
Thanks Amy for another great challenge!


