I love Instagram. I was a bit of a late adopter, signing up in October 2014, posting once and then posting a second time in November. I didn’t really get the point of it to be honest, and didn’t post again until February of the following year.
However, once I had devoted just a little bit of thought and time to it, I began to see the benefits:
Promoting the business. By actively seeking out potential stockists on IG, following them, interacting with them and even direct messaging them, I’ve gained five new wholesale accounts in the last 9 months.
Connecting with other soapmakers. When you’re as obsessed with soapmaking as I am, following, ‘meeting’ and chatting online with other soapmakers (many of whom are now Facebook friends too) is a joy. I once tried to reach out to a local soapmaker with the hope of soapy chats over mugs of tea (can’t stand coffee lol) but was rebuffed. I have no idea why, but I thought it was a shame – there are absolutely enough customers out there for the both of us but hey ho… I digress – IG has helped me to meet loads of other lovely, friendly and inspirational soapmakers, even if it is only online.
Which brings me to – Inspiration. Now I’m not talking about seeing someone else’s soap and copying it – that’s very much frowned upon, and rightly so. No, my inspirational browsing is purely revelling in the beauty and creativity that is other people’s soaps. Sometimes I might see something that inspires me to try a particular natural colourant, or give a particular technique a go. Sadly though, I’m usually too busy making my own restocks that I rarely get the opportunity to ‘play’ and experiment.
It’s a vanity platform. Let’s be honest, it’s a rare person who doesn’t enjoy a bit of positive feedback. Once you have a few followers and those hearts and comments start totting up, it’s quite a confidence booster.
November’s challenge over on Amy Warden’s Great Cakes Soapworks was to (attempt to) recreate what Amy named the ‘Tall & Skinny Shimmy’. This technique is also called the wall pour or segment filling, and has been perfected by Tatiana Serko, an amazing soaper who created the tutorial video for the challenge. I’ve seen this design before and always wondered how it was done, SO there was no doubt in my mind as to whether I’d be giving it a go this month. Here’s the design she created for the tutorial:
Tatiana’s Tall & Skinny Shimmy
I recently bought a shiny new tall & skinny mould, and this challenge marked it’s first outing. This was the first problem. Turned out the mould holds more soap than my regular mold. I kind of thought it would, but checked on the website where I bought it to make sure. Unfortunately, in my haste, I looked at the wrong listing, and so had the wrong volume in my head. Luckily I’d had a sneaking suspicion that that figure might be incorrect (just by looking at the mould – which is LONG), so I prepped two batches of my masterbatched oils, just in case.
I decided (once again) to use a fragrance I’d not used before. Not as crazy as it sounds – I used a blend of Patchouli & Sweet Orange essential oils, both of which I’ve used separately many times without any problems.
I added the fragrance blend to the oils, then added the lye and mixed gently with a whisk until the soap was fully emulsified, but no more. In her tutorial, Tatiana said that she doesn’t use a stick blender, and simply lightly hand mixes her soap. With some trepidation, I decided to do the same, and split the soap into seven, colouring each portion a different shade, and mixing thoroughly by hand.
Prepped colourants
I then set up my mould as per Tatiana’s instruction. I placed two pencils parallel to each other on my work table, on either side of my mould. I put one side of the mould onto one of the pencils, so that there was a tilt to the mould, and then poured the first colour down and along the side of mould that was NOT on the pencil. I then moved the mould so that the other edge was sitting on the other pencil (and the mould was therefore tilted lengthways the other way) and poured down and along the opposite side. I did this with all seven colours, alternating the side each time. The soap was very thin, and had barely reached trace – I think it perhaps could have been just the tiniest bit thicker – note to self for next time…
Anyway, of course, it turned out I didn’t have enough soap made up to fill the mould, so I quickly separated out another three portions of the second batch, added colour, and continued to pour. The pouring was fast and fraught, and I didn’t get the opportunity to take any photographs – sorry!
Once the pour was complete, and the mould was full, I swirled to the top and put it to one side to harden up.
Tall & Skinny Shimmy in the Mould
As it was poured at such a light trace, it took a while to harden up sufficiently, but three days later I felt confident enough to take it out of the mould:
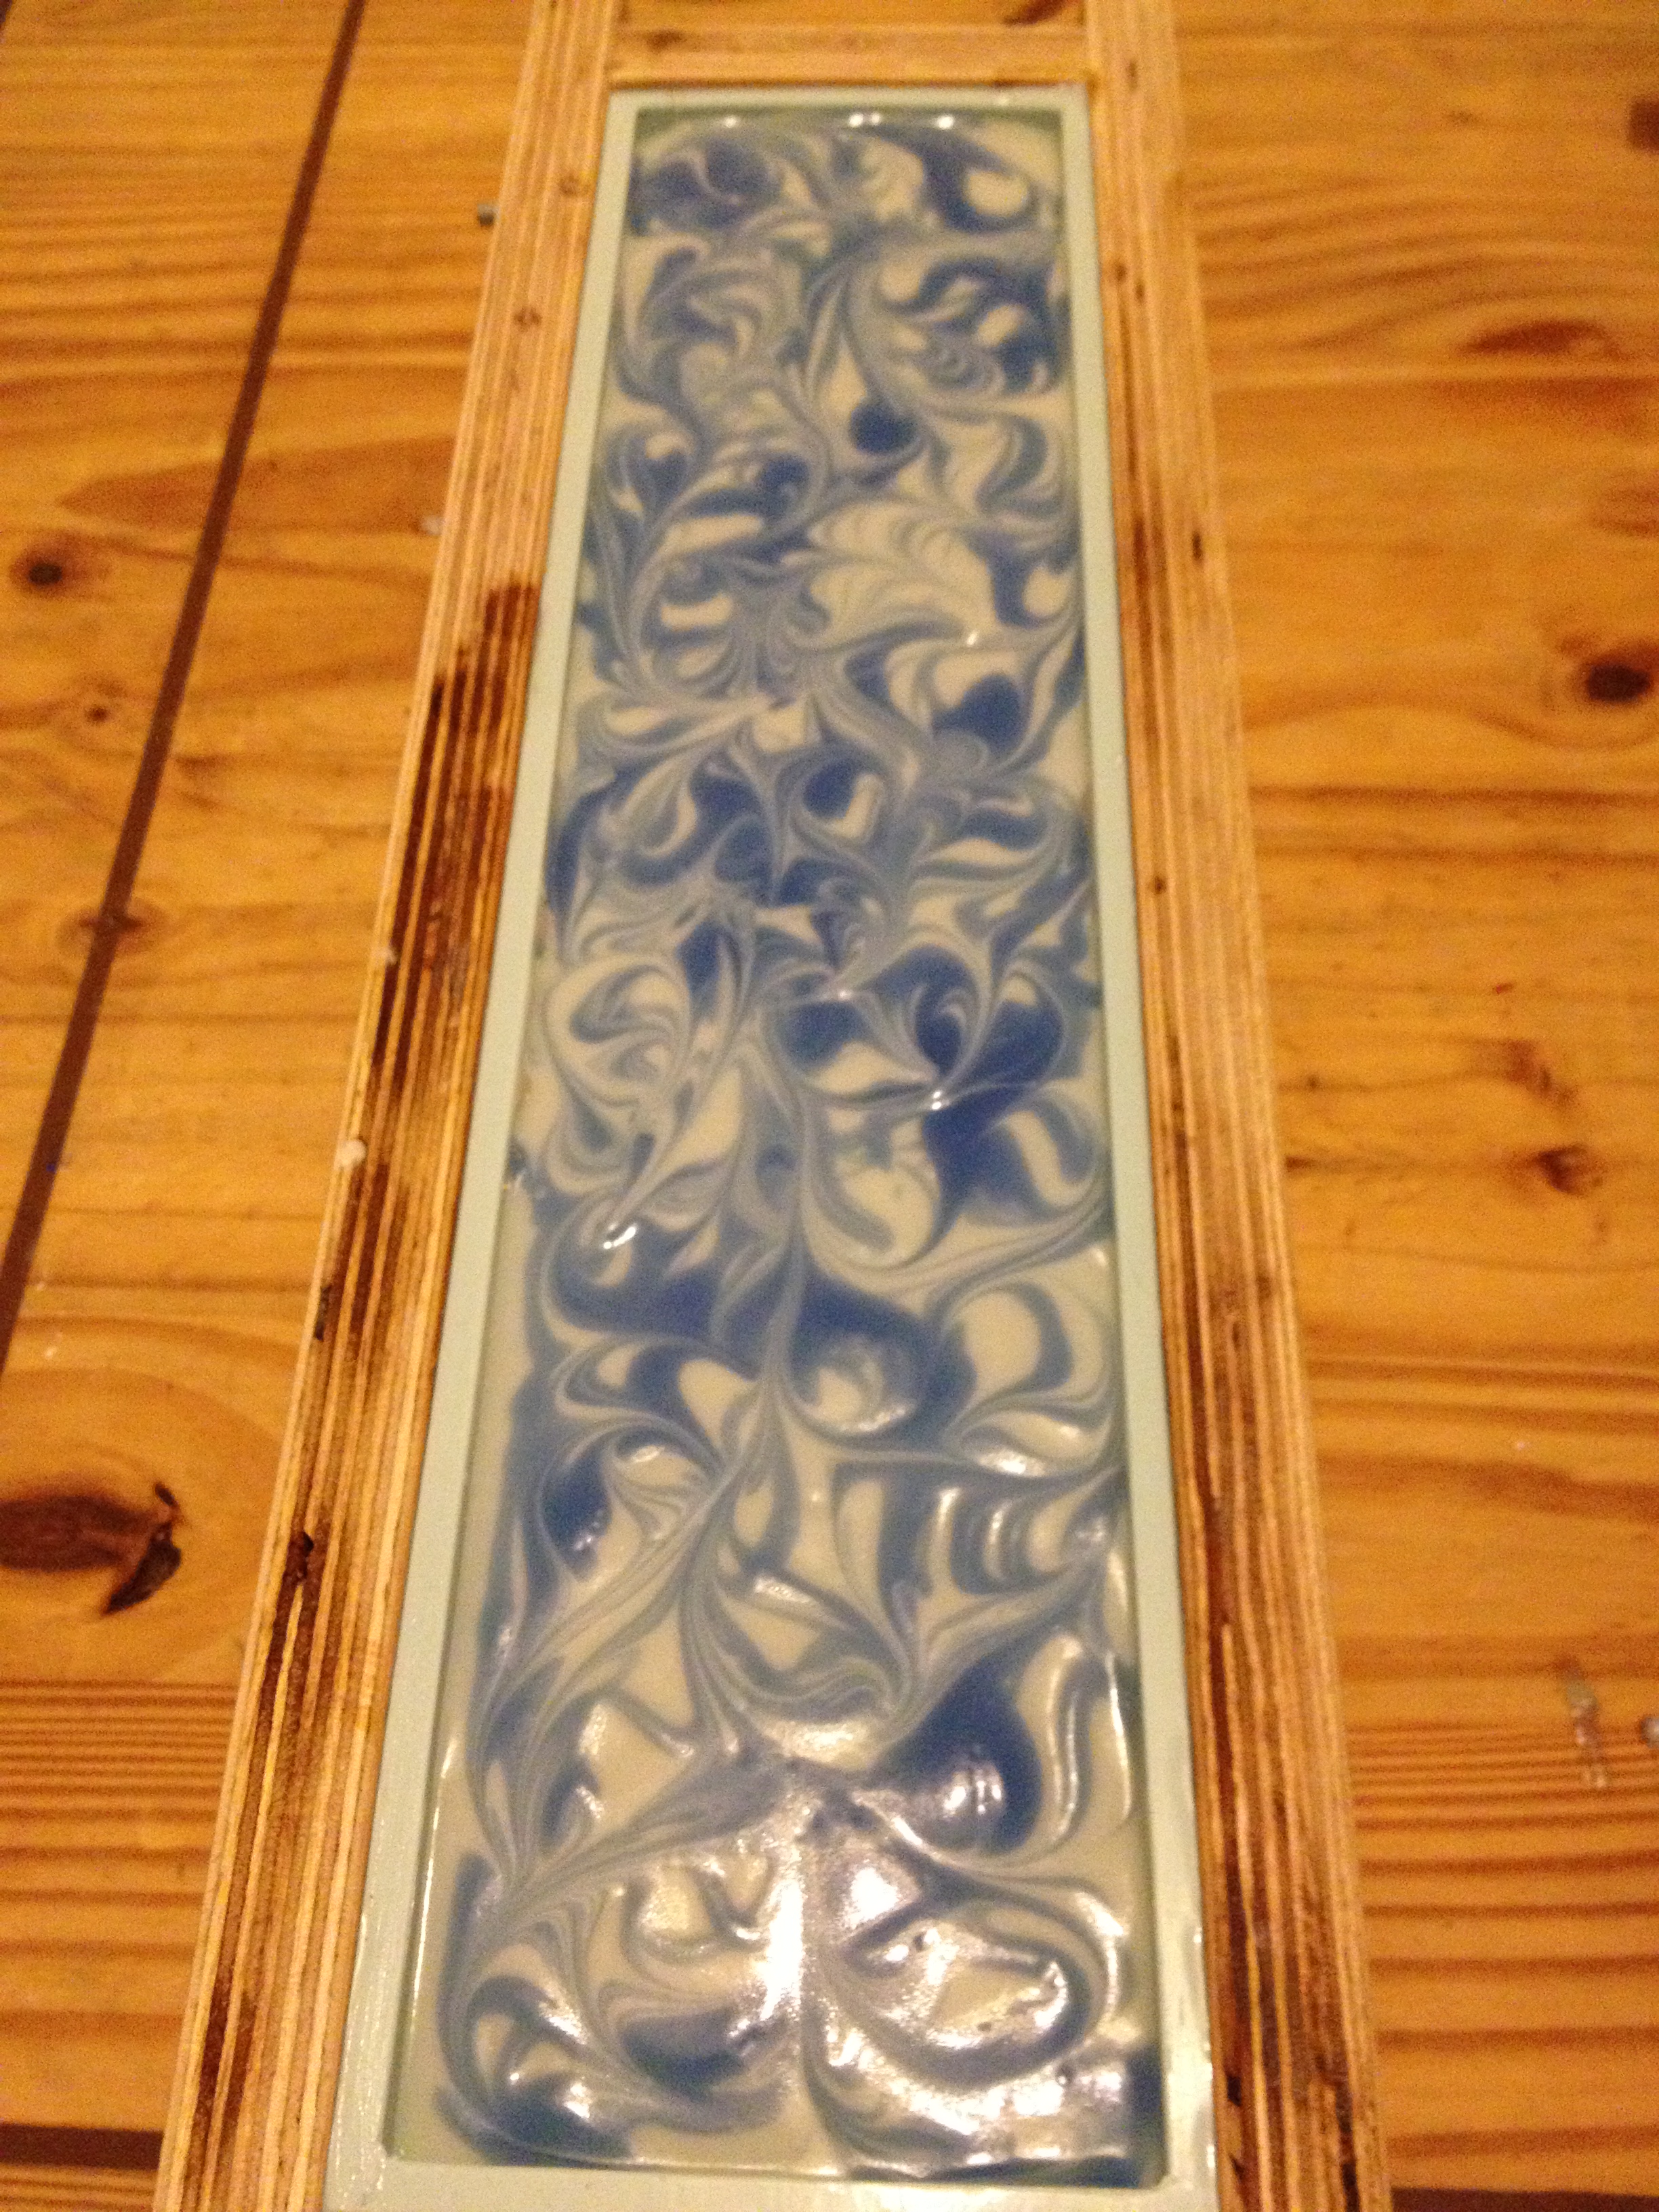
Ready for cutting
I was REALLY apprehensive about cutting this one, I didn’t have the time (or the ingredients) to make another one, so I was hoping it wasn’t a complete disaster. As it was, it’s not too bad. I did get a little bit of a shimmy, but there’s no doubt that the pouring left a lot to be desired!!
Tall & Skinny Shimmy (kinda)
I think had I had the correct volume of soap from the beginning, and just had the seven colours to pour, I may have had more luck – it’s clear that my scrabbling for more soap towards the end caused issues with the design at the top.
Another issue I had was that the silicone liner was so tall and long, it didn’t stay flush to the sides of the mould – the sides bent into the middle, and so while pouring down one side, I had to use my other hand to hold the other side of the silicone mold away from the middle, which was a bit awkward.
I’m really happy to have been able to give this one a go, and will probably try it again at some point in the future – thanks Amy!
Thanks for reading – I’ll be back soon with a post on my holiday soaps.
This month’s challenge for Amy Warden’s monthly Soap Challenge Club over at Great Cakes Soapworks is to create a soap using the ‘Clyde Slide’ technique. The Clyde Slide is named after Clyde of Vibrant Soaps, who uses this technique to create beautiful (and exquisitely coloured) soaps – do check out his videos on YouTube if you get the opportunity.
As I’ve just started production of this year’s Christmas soaps, I decided to design my challenge soap around a fragrance oil called ‘Yule Log’. It’s a chocolately, almondy, cakey fragrance, with notes of cinnamon, ginger, vanilla and musk and is delicious out of the bottle. How does it smell in soap? I’d love to tell you but, um, well, I forgot to add it. Oh well, sensitive noses deserve pretty soap too don’t they?
I used a light brown mica as the base colour, to represent the sponge, and dark brown mica, titanium dioxide (white) and red liquid colourant for the cream, chocolate and holly berries elements. I did consider using a little green too for the holly leaves, but in the end I’m glad I didn’t.
I prepped the soap batter and added the colours, making sure I kept the batter at a light trace:
Coloured soap
Then I poured the white, red and dark brown soap batters into the bowl containing the lighter brown soap. I completely forgot to take a photo of this stage, but I used exactly this pattern (this was my second attempt):
Clyde Slide in the Pot
Usually, when I use the ‘In the Pot’ technique, I would now give the pot a quick stir, just once or twice, but I always stir before pouring. For a Clyde Slide, you DO NOT stir. I can’t tell you how much I wanted to stir!!
Here it is mid-pour:
Clyde Slide mid-pour
Then I swirled the top:
Clyde Slide top swirl
And two days later, Ta Da!! My unscented Yule Log Clyde Slide:
Clyde Slide, The Cut
And here’s a close up to show the trademark ‘Clyde Slide’ feathering – it’s not a blurred photo, honest :-D:
Clyde Slide Close Up
Many thanks to Amy for her major feat of organisation (apparently there are over 180 entrants this month!), I’m really looking forward to seeing all the other entries. Good luck if you’ve entered!
Despite signing up for them at every opportunity, it’s been an awfully long time since I’ve managed to get round to make a soap for Amy Warden’s monthly Soap Challenge Club over at Great Cakes Soapworks. This month’s challenge really piqued my interest though, and I was determined to give it a go. The challenge was to create a soap using the Spinning Swirl technique (which I hadn’t come across before) and, after months of making nothing but restocks, I was keen to try something a bit different. This technique involves pouring very fluid soap batter into a slab mould and then spinning the mould itself. Amy provided a great video tutorial, and this one of the soaps that she made to illustrate the technique:
Amy’s Spinning Swirl Soap
One of the stipulations of the challenge was that the soap had to made in a slab mould, which I don’t own. So my first challenge was to improvise a slab mold. A shoe box did the trick:
Improvised Shoe Box Mould
I prepared my colourants. The fragrance oil is described as a creamy, powdery, honey fragrance, and I wanted warm colours to reflect that. I used Radiant Gold mica, Sicilian Orange mica and Red iron oxide and mixed them with a little of the oils (to which I’d already added the fragrance).
Colourants mixed with a little oil from the main batch
I added the lye to my usual oils and butters, and then poured the batter equally into the three jugs, stirred well then stick blended very VERY briefly (as I needed it to stay fluid for as long as possible):
Soap ready to pour
I poured the soap into the mould, alternating colours in a faux-funnel type pour:
Soap mid-pour
Once the soap was all poured, I gritted my teeth, gripped the mould with both hands, and started to rotate the mould as quickly and as firmly as I dared while praying that it wouldn’t all slosh out onto my table. After making probably about 20 full rotations, I swirled the top with a skewer and put it aside to firm up. A couple of days later I unmolded and found this left behind in the diy mould:
Leaked soap!
THAT is why I love my silicone moulds so much 😀 Anyway – the unmolded soap didn’t look too promising:
Unmoulded Spinning Swirl
Not only do I not have a slab mould, I also don’t have a cutter that can cope with a big ole slab of soap, so I had to make the first cuts with a Very Big Knife. Needless to say, I wasn’t particularly accurate:
First cuts – Spinning Swirl
And THAT is why I love my single wire Bud cutter 😀 Anyway, I was able to use my beloved cutter for the rest of the cuts:
Final cuts – Spinning Swirl
And, after a little love and attention, I’m really happy with the result:
Spinning Swirl Soap
Many thanks Amy for organising the challenge! It was a real pleasure to try something new and I’m looking forward to seeing what the other entrants come up with.
Daffolidish? Daffodilesque? Daffolidic? I don’t know, answers on a postcard please 😀 What I DO know is that I won’t be soaping with Daffodil fragrance oil again any time soon!
It’s been a while since I participated in one of Amy’s challenges over at Great Cakes Soapworks so I decided to give the December challenge a shot. ‘Cos of course I’m not really really busy with Christmas Fairs at the moment, oh no, not me…
Having decided to sign up for the challenge (which, by the way, I have done for the last goodness knows how many months but not actually managed to make anything in time) I also signed up for a new idea Amy’s organised, a Soap Swap. I really love trying other soapers’ creations, but if I’m honest I think my main motivation for signing up was to make sure that I actually entered the challenge. Once I’d commited to swap my soap with another contestant, I knew I couldn’t just ‘not get round to it’.
The challenge this month was to make a soap using the spoon swirl method. This is something I’ve done many times before, and which I knew needed no fancy equipment other than the usual, plus a spoon. And Amy’s excellent tutorial video confirmed that yes, I did indeed already know how to do this one. So far so good.
I took a moment to decide on which fragrance to use. I didn’t want to use any of my regular range, as they have fixed designs, none of which is a spoon swirl. So something different, something that could, possibly, become part of the range if it turned out fantabulous. I opted for a delicious daffodil fragrance. First mistake. Using a new-to-me fragrance for a challenge / swap soap was not one of my greatest decisions.
I melted the oils and butters that needed it, then stirred in the liquid oils, and the fragrance oil. I chose three lovely micas which I thought represented daffodils perfectly, and combined them with a little of the melted fats. I know many soapers add the powdered mica directly into the soap and stick blend it in, and it works just fine. I keep meaning to try that but I guess I’m a little stuck in my ways!
Prepped Micas
I usually soap at room temperature, so I used some pre-prepared (water discounted) lye solution, and there you have my second mistake. Knowing that floral fragrances have a tendency to accelerate, I really should have used the full recommended water amount.
Anyway, you can probably guess what’s coming. I slowly added the lye solution to the fats and immediately it started to thicken. There wasn’t a lot I could do but, knowing that I wasn’t going to get another opportunity to make a challenge soap by the deadline, I carried on, managed to get a bit of colour mixed in, and squished it into the mould. I DID then spoon swirl it. I really did! If you look closely at the pic below you can see where the spoon moved within the mould, but it’s not really that clear 🙁
Daffodil Spoon Swirl (honest!)
Oh dear. My poor swap partner. Sam – if you’re reading this, I will send you a bar of this one (it does smell lovely!!) but I’ll also send you one of my more successful soaps!
This month’s challenge over at Amy Warden’s Great Cakes Soapworks was to make a soap with embeds, ie soap with different shaped/coloured soap embedded within in it. One of the examples Amy used in her tutorial was this beauty:
Isn’t it gorgeous?
I wasn’t going to enter the challenge this month as we move next week (are you bored of hearing about it yet? 😉 ) but I do like getting involved so decided to whip up something simple at the last minute, just so that I could take part. I’ve already taken a peek at some of the other entries and there are some absolutely stunning creations, I’m a little embarrassed to post my little simple soap, but hey ho – I might win the booby prize :0)
Back in 2012 I made a soap that was really popular, called Bubblicious:
and I thought it would be a quick and easy one to replicate for this challenge.
So I made up two small batches of soap and coloured one pink and one lilac. After about 24 hours I unmoulded them and started to roll different sized balls out of both colours:
This soon became ridiculously laborious and I realised I could probably get exactly the same effect if I rolled lengths of soap like these:
I then made up a larger batch of soap and added titanium dioxide to make it nice and white. I fragranced it with a lovely floral blend of Rosewood and Ylang Ylang essential oils.
I then simply poured a small amount of soap into the bottom of the mould, laid some balls in and covered them with the white batter, then repeated until the mould was full, making sure I kept enough balls back to decorate the top of the soap. Voila:
And here are the cut bars:
Very simple, but a nice effect nevertheless. There are so many ways to play about with this technique, I’ll definitely be making many more embed soaps in the future.
Thanks, as always, go to Amy Warden for organising the challenge and giving us all an opportunity to drool over each other’s creations :0)
My original plan was to create a four colour version of the black and white soap in the header <up there> but it thickened up really quickly on me, and I had to work quickly to spoon it into the mould and swirl the top.
It’s scented with “Jelly Beans” fragrance oil, a sweet, fruity fragrance that has held well, and really suits the colourful design.
This month’s soap challenge over at Amy Warden’s Great Cakes Soapworks is the Dandelion Zebra Swirl, created by Vinvela Ebony and named after her blog Dandelion Seifee. It’s not something I’ve done before, so was keen to give it a go. It should look like this:
To create this design you need something like a flexible cutting board (which is what I used) cut to fit exactly inside the length of the soap mold. Once half the base colour is poured, you insert the thin cutting board into the middle of the mold and pour alternate thin layers of the coloured batter down the cutting board. You then carefully remove the cutting board and pour the rest of the base colour (being careful not to disturb the coloured layers)
The reason for that rather convoluted description of the process is that I was concentrating so much that I completely forgot to take any ‘during’ photos <facepalm>
I have ‘before’ pictures:
I have ‘after’ pictures:
But no ‘during’ photos. Sorry :-s
Anyway, here it is: my first attempt at a Dandelion Zebra Swirl. The green (chrome green oxide) and red (pigment) colours thickened up a little more than I would have liked, but the yellow (lemon drop mica) stayed nice and thin. It’s fragranced with Apple Pie & Custard FO.
All in all I’m really happy with the way it turned out. Thanks as always to Amy for organising the challenge, and I’m looking forward to seeing all the other entries!
This month’s soaping challenge over at Amy Warden’s Soap Challenge Club is a multi-coloured gradient soap. Now I’ve made gradient soaps before, but all of my previous gradient soaps have been one colour plus white, where the base is the main colour and subsequent layers gradually get lighter by adding increasing amounts of white soap batter.For the challenge, Amy stipulated that we should use three colours (and no white, gulp!), so this was definitely stepping outside my comfort zone. I decided to go with the primary colours, blue, red and yellow (though my red turned out decidedly salmon pink, but never mind….)
First I prepared my three colours – ultramarine blue oxide, lemon drop mica, and deep red mica (hmmm!), and tragedy struck! OK, so that’s a bit of an overreaction, but my coffee frother, which I use to disperse the powdered colours, fell apart on me:
Fortunately I’d already done the yellow and red, so I finished off the blue with a spoon and hoped for the best.
I then mixed the oils and butters with the lye, added the fragrance (a zesty lemon fragrance oil) and brought the mix up to a light trace. The main difficulty for me with this one was knowing how much of each base colour to start with. I watched Amy’s video a few times, and realised that I had no idea how much a ‘cup’ was 😀 I decided just to eyeball it:Then I started the pour. A layer of just blue went in first – about a third of the ‘blue’ jug. I then added about a third of the red into the ‘blue’ jug, gave it a good mix and poured another layer. I added another third of red into the ‘blue’ jug and poured the lot into the mould to form the third layer. The aim each time was to have straight layers which didn’t break into the layer below – I was partially successful I think…
I then poured a layer of just red from the ‘red’ jug. This was the fourth, or middle, layer:
I added about a third of the yellow soap in with the red, mixed and poured a layer. Then another third of yellow into the ‘red’ jug and poured again. The seventh and final layer was pure yellow – no wastage – yey:
After 24 hours I unmoulded and cut. I’m really happy with the result:
I did find this one pretty challenging – I was working against a fast thickening batter towards the end, and wasn’t certain that I’d get all the layers done before the soap seized on me. It was a great experience, but I’m not sure I’ll be making a multi-coloured gradient soap again any time soon :0D
As always, thanks go to Amy Warden of Great Cakes Soapworks for planning and organising the whole shebang!
Who wants to learn the Holly Swirl? I have to confess that up until very recently I’d never heard of the Holly Swirl – it’s a ‘swirl within a swirl’ and so called because it was first created by Holly Bailey of Missouri River Soap Co. It’s also the technique featured in this month’s Soap Challenge Club (the results of last month’s challenge can be seen here). This is one of Holly’s beautiful soaps:
Having registered and watched the online tutorial I set about creating my own version.
Starting with a batch of my basic soap batter, I took out just under a half, coloured it with a pink oxide and poured it straight into the soap mould. I then split the remaining half of batter into two and coloured one portion with blue ultramarine oxide and the other I whitened with titanium dioxide. I put a small amount of the blue and white to one side to create the top of the soap later.
Now for the first swirl. Using a jug I poured the blue soap batter into the bowl holding the white soap batter, holding the jug up high and slowly moving it around. No stirring, no mixing – that was the swirl done. I didn’t take a photo of this stage so I hope that bit makes sense!
And the second swirl: I poured the combined blue and white batter along the length the mould, from a height. This was a little tricky as I wanted it to penetrate deep into the pink, but not so much that it settled on the bottom of the mould. It was, to be honest, an educated guess 🙂
I then carefully topped the soap with the remaining white batter, drizzled over the blue, and gave it a swirl:
After 24 hours I took the soap out of the mould:
And cut it:
I’m really happy with how it’s turned out. If I did it again I’d probably use more vibrant colours to better show off the lovely swirls, but not bad for a first attempt I reckon! Oh, and it’s fragranced with Vanilla Bean from Gracefruit – it’s supposed to be non-discolouring so hopefully the colours will stay true…
Thanks are due again to Amy Warden of Great Cakes Soapworks for setting up and hosting the challenges – I’m having a ball 😀
This website uses cookies to improve your experience. We'll assume you're ok with this, but you can opt-out if you wish. Cookie settingsACCEPT
Privacy & Cookies Policy
Privacy Overview
This website uses cookies to improve your experience while you navigate through the website. Out of these cookies, the cookies that are categorized as necessary are stored on your browser as they are essential for the working of basic functionalities of the website. We also use third-party cookies that help us analyze and understand how you use this website. These cookies will be stored in your browser only with your consent. You also have the option to opt-out of these cookies. But opting out of some of these cookies may have an effect on your browsing experience.
Necessary cookies are absolutely essential for the website to function properly. This category only includes cookies that ensures basic functionalities and security features of the website. These cookies do not store any personal information.
Any cookies that may not be particularly necessary for the website to function and is used specifically to collect user personal data via analytics, ads, other embedded contents are termed as non-necessary cookies. It is mandatory to procure user consent prior to running these cookies on your website.