Yippee for Fridays! And today has been a particularly good day.
It’s my wedding anniversary. 11 years ago today I married my best friend, and today I’m counting my blessings just that little bit more.
I delivered the first order to a brand new stockist – more of that in another post very soon.
My ‘coming soon’ bathbombs received a glowing review.
Not a bad day eh? We’re off out this evening for a rare outing – dinner, just the two of us, without the constant interruption of children. I. CANNOT. WAIT.
Anyway, back to that bathbomb review. A couple of weeks ago I posted a picture of my trial bathbombs on Instagram and one of my IG buddies mentioned on the post how much she liked them. I offered to send her one to try, on the proviso that she give me her honest feedback. Well, turns out she loved it, and wrote a glowing review on her blog:
“The colour is awesome ! Unlike some bath bombs I have used before it doesn’t leave a horrid layer around the bath after draining the water . Neither does the colour stain the bath.”
Please check out the full review on Beauties and the Bibs There’s even a video of the bomb in action – please check it out!
It’s been a great day so far. Hope you have a wonderful one too.
I started out so well. Most of my Blogtober posts have been planned, if not half written, the day before, at least. Occasionally they’ve been written early morning, on the day. Never before have I got to past 10.30pm before getting an opportunity to sit down and write. I’m flying by the seat of my pants here…
So it’s going to be another quickie (though I would imagine that’s no big thing when they’re coming at you every day :-D)
I’ve mentioned before that I’m a HUGE Instagram fan and Instagram is where Throwback Thursday comes into its own. Using the #throwbackthursday hashtag gives you the opportunity to showcase pictures of projects, creations or events from the past, and for me it’s a chance to look back at soaps I made years ago.
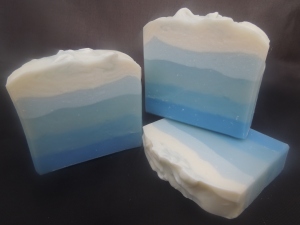
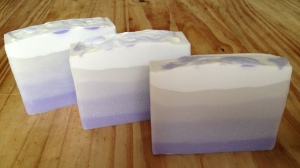
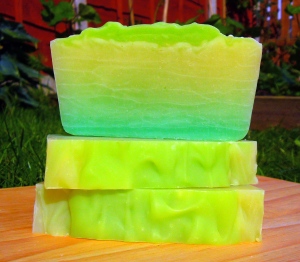
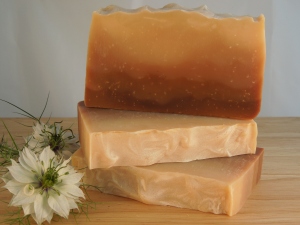
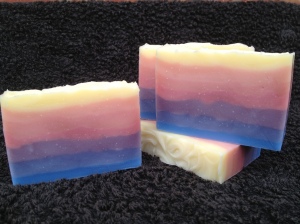
Back in 2013 I went through a phase of making gradient, or ombré, soaps. For some reason I’ve not made any since, but anyway, today seems like the perfect opportunity to share some photos of them here. Wonder if you can guess which ones were made in a proper soap mould and which ones were made in silicone baking pans 😀 😀
Blue Gradient (Ocean Mist) Purple Gradient (Wild Berries) Pink Gradient Green Gradient (Citrus Burst) Brown Gradient (Amber)
This last one was made in September 2013 for one of Amy @ Great Cakes Soapworks monthly challenges – the challenge was to make a gradient soap using more than two colours:
Multicoloured Gradient (Eventide)
Actually I know perfectly well why I’ve not made any gradient soaps recently – I’m so busy keeping up my stock levels I’m not getting any opportunity to ‘play’ and make soap for fun. Now there’s something to put on my ‘To Do’ list.
Blogtober Day 10. Day 10 folks!! A third of the way through, nearly…
Anyway, this the sixth in an occasional series on the evolution of Soap Mine soap designs. Previously I’ve covered Serenity, Wake Up! (discontinued), Tutti Frutti,Delicious and Luscious Lavender, and this time it’s the turn of ‘Clarity’, fragranced with a gorgeous fresh blend of Lemongrass and Clary Sage Essential Oils.
This one has proved to be one of my bestsellers over the years, and I’ve been making it for a long time, so please forgive the quality of some of the photographs. I’ve said it before but soap photography is as steep a learning curve as soap making!
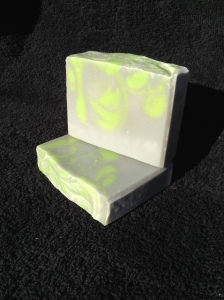
First came the two color version – a cool grey base with lime green drops:
Clarity v.1
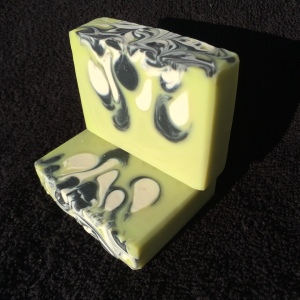
I wasn’t overly enamoured with with the grey, so soon after it became a three colour bar, with a green base and white and black drops.
Clarity v.2Clarity v.3
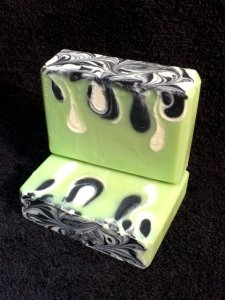
When I started adding texture to the tops, Clarity was included of course:
Clarity v.4
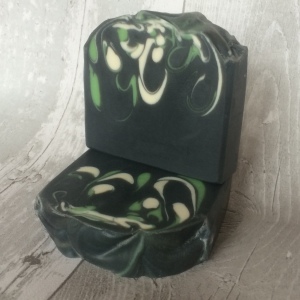
And so it was, for many, many batches. But then one day, very recently, I decided to ring the changes and, drum roll please…Ta da! This is the new look for Clarity:
Clarity v.5
The black base of the bar is coloured with activated charcoal, purported to be excellent for your skin. I found this post recently which talks about the benefits of activated charcoal in soap, but of course, I make no medical claims for my soap whatsoever! 😉
There’s no point pretending any different by this point, Christmas IS coming 😀
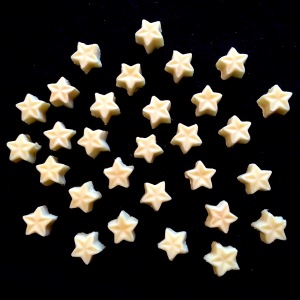
I’m waiting for my holiday soaps to harden up a little so that I can get them bevelled and generally tidied up before I take some decent product shots, but here’s a first look at what I did with those stars I posted three days ago. Nothing fancy, but I rather like the simplicity of this one:
One week of Blogtober successfully completed – woop! Today is day 8, the first day of a new blogging week as far as this challenge goes, and the first day I’ve come down in the morning and had nothing prepared to post. This is primarily because I’ve been spending the last couple of days wrapping and labelling every chance I get for a couple of large orders going out soon, so it makes sense to show you my soap packaging.
These are the full sized bars, wrapped and labelled. I place each bar into an individual cellophane bag with the ingredient label tied on with natural raffia.
Full Size wrapped bars
Behind each soap I place an insert with all other mandatory information – contact details, weight of bar, batch number and best before date:
Insert Card
I also offer guest sized bars, which are one third of the size of regular bars. These have proved popular with guest houses and holiday rental properties, but I don’t sell them individually – they’re far too much work:
Guest Bars
Have a great Saturday, whatever you have planned. Back tomorrow 🙂
A couple of months ago I began supplying my soap to a local retailer, Glosters in Porthmadog. Glosters is a beautifully curated gift store, stocking handmade items made in-house, locally and further afield in the UK.
They took a selection of my regular range, but also wanted something exclusive, just for them.
One half of the Glosters team (Tom) is a potter (who sells his ceramics in the store) and the store also has a nautical feel to it. It made sense therefore when Myfanwy (the other half of the Glosters team and textiles whiz) said that she would like a ‘Potters’ soap and a ‘Sea’ themed soap. I sent away for some sample fragrances, and in due course Myfanwy chose her two favourites.
This is the Potters Soap, fragranced with a fresh, clean scent of green florals and citrus, on a base of amber and musk. The dark blue reflects the colour of the Glosters’ logo, and for this one I kept an element of my signature drop swirl:
Potters’ Soap
And this is the Sea Soap, fragranced with a refreshing salty sea fragrance (of course!), designed with the sea in mind and topped with real sea salt from Halen Môn:
Sea Salt Soap
Both these bars will be available exclusively from Glosters very soon.
Did you know Wet Soap Wednesday is a thing? Certainly on Facebook and Instagram it is anyway. Today’s post is a quickie – the fruits of last night’s soaping session.
From left to right: Three Kings, Luscious Lavender & Christmas Tree
I posted last year about the first bar of soap I ever made and I’ve shared the ‘how’ post again below. But WHY did I make that first batch of soap? It’s a question I’ve been asked many times and the answer is quite simple. Curiosity. A friend came to visit, and proudly showed me some soap that she’d made. I was intrigued. How on earth did one make soap at home? Up until that point I’d assumed that it was some kind of highly technical laboratory process and I don’t think I’d even wondered whether it was possible to make it at home. It was just there. Soap. From the shop.
Had I ever suffered from sensitive skin, or had problems using soap I may have looked into it earlier. It’s more likely however that I would have gone and bought soap ‘for sensitive skin’ and left it at that. Nor did I try soapmaking because of ecological or environmental concerns *blush* (yep, I know a whole lot more about that side of things now!) No, it was pure curiosity. I did a bit of internet research, and became more and more excited. There was a whole big soapmaking world out that and it was fascinating.
My very first attempt was with a soapmaking kit. With hindsight I could easily have bought what I needed separately and just got on with it, but if I’m honest I wanted to MAKE SOAP NOW and the kit sped things up for me a little. I made soap, and I loved it. So what next?
I bought some books. Okay, I’ve bought a lot of books. One of my first was Smart Soapmaking by Anne Watson. A great book, though I did find that I had to tweak the recipes slightly when I ran them through Soapcalc. In those early days I also bought The Everything Soapmaking Book by Alicia Grasso, The Natural Soap Book by Susan Miller Cavitch and The Handmade Soap Book by Melinda Coss. Since then I’ve bought many more – I’ll have to gather them together and write a round up of soaping books I think.
I also did a lot of internet research. I don’t recall too many forums or Facebook groups back then, but there were an awful lot of Internet articles offering their soapmaking advice.
So having made that first batch of soap out of pure curiosity, and doing a LOT of reading on the subject, I was hooked, and I’ve never looked back. (Well, apart from when I was pregnant with my second child. The smell of all fragrance oils made me feel so violently sick that I had to have all my soapmaking stuff – including ALL handmade soap – put away where there was no chance I’d catch smell of it – for months… They were dark days :-D)
I’ve been using a partial drop swirl for all my essential oil soaps for a long time but for my fragrance oil bars I’ve been using a mix of styles – In the Pot, Tiger stripe, Drop – whatever took my fancy at the time of making. As I’m now selling more wholesale soap than I am retail, I’ve slowly come to the realisation that my FO bars need to be of a uniform design too.
It took me a little while to settle into the idea. Soapmaking is such a creative process and half the fun is coming up with new designs and trying out new techniques. I reluctantly came to accept that I needed to choose a style and stick with it, making it synonymous with The Soap Mine brand and making my soaps (hopefully!) instantly recognisable.
I wanted to retain a link between my EO soaps and my FO soaps, while ensuring it was easy to tell them apart, so the obvious choice was to make my FO soaps using a full bar drop swirl.
I’ve been making soap with this technique for a long time – this was the first one I ever made (years ago!), fragranced with coconut FO.
Black & White Drop Swirl
And these are some more recent makes – this is what my FO soap bars will look like for the foreseeable future.
Delicious (Similar in scent to the DKNY designer fragrance Be Delicious)
Delicious
Oatmeal Milk & Honey:
Oatmeal, Milk & Honey
Welsh Rose:
Welsh Rose
Blue Belle (Similar in scent to Jo Malone’s ‘Wild Bluebell’ designer fragrance)
Blue Belle
I guess the next thing to focus on is standardising the photography :-O
New Year is generally a time for looking forward for me (I’m still working on those 2016 business goals I touched on in my last post) but last week I was browsing and sorting (supposedly – I’m easily distracted 😉 ) through my HUGE collection of soapy photographs and I came across some from the early days. I can remember being SO proud of this one – my first every straight lavender essential oil soap:
Luscious Lavender #1
Note the rounded corners – I hadn’t yet discovered the joys of silicone liners lol… You can also see the signs of a partial gel here too.
It wasn’t long before I began standardising (and simplifying) the swirls, and this was the next incarnation – an In The Pot (ITP) swirl:
Luscious Lavender #2
I went through a phase of experimenting with mica in oil swirls on the top of the bars – though I’m not sure why I thought this was a complementary colour for the top-swirl…
Luscious Lavender #3
When it came to developing a cohesive range I decided to make all my essential oil soaps with a drop swirl, and so came up with this two colour lavender drop in a white base:
Luscious Lavender #4
The colours have remained the same ever since – I use titanium dioxide for the base and two micas called ‘grape’ and ‘lilac beauty’ for the drops:
Luscious Lavender #5Luscious Lavender #6
Thanks for checking in – I really do hope to be back soon with those 2016 goals!
One of my best sellers is, quite literally, ‘Delicious’. It’s fragranced with a dupe of the DKNY fragrance ‘Be Delicious’ which has the fresh scent of apples blended with floral / woody fragrances. To date I’ve always made it with a simple ITP swirl (with apologies for the lighting on the bottom bar):
Delicious – ITP Swirl
When I’m against the clock and frantically trying to get my stock levels back up, an ITP swirl is mercifully quick to execute. But, for me at least, they are unpredictable, and the colour distribution isn’t always as I would like. So I decided to try using the same colours but with a drop swirl, and this is how it came out:
Delicious – Drop Swirl
I LOVE it! So that’s me with one less ‘quickie’ during busy stocking-up soapmaking sessions, but I reckon it’s worth it 🙂
It has though brought to mind an ongoing dilemma I have about what’s most important when it comes to the soaps that I create. I put a lot of thought into what oils and butters go into my bars to give them skin-loving, super-lathering properties, but then I hear people say that they look too pretty to use. It’s a phrase I’ve heard at every single craft fair / Christmas market I’ve ever sold at. I know people are being complimentary but – Noooooooooooo! Use them! Use them, then buy more 😀
Last year I made just one batch of soap specifically for the holiday season. I swapped the usual raffia for a seasonal ribbon, and it sold out within a couple of days. I posted at the time that it was a case of bad planning, but by then it was too late to do anything about it, and I vowed to do better this year.
I was super-organised, and ordered my Christmas fragrances in August (!!). I decided to make four different Christmas soaps. Four different designs made with four different fragrances. If I’m totally honest, I have mixed feelings about this lot, but judge for yourselves:
First up was Candy Cane – a mouthwatering fragrance which blends peppermint and vanilla. I liked this one so much I made a second batch, and good thing too, as it’s proving very popular and the first batch is already sold out.
Candy Cane
Next I had a plan to create a stylised Christmas Tree design, complete with baubles. My main disappointment with this one is that I somehow had a brain freeze while rolling the ‘baubles’ and I made them two small. To me they should be the same diameter as the baubles on the top of the soap. I also tried to get clever and create some variation in the colours/designs of the baubles themselves by rolling different colours together, but it didn’t work as well as I hoped. Perhaps they would have looked better had they been larger. Anyway, they may look a bit quirky, but they certainly smell like a Christmas tree – the fragrance oil has top notes of pine needles and and spicy, woodsy middle and base notes.
Christmas Tree
The third fragrance was called ‘Yule Log’ which, predictably, is a sweet chocolate scent, with notes of bitter almonds, cinnamon, ginger and vanilla. I planned to use this fragrance oil to make my ‘Clyde Slide’ entry for the September Greatcakes Soapworks challenge and used colours which are reminiscent of a Christmas Yule Log:
Yule Log
Sadly I was focusing so much on mastering the technique that I forgot to add the fragrance oil – arrrgghhhh! Never mind, I made it again and now have a scented and an unscented version 😀
My final Christmas design for 2015 is a second Clyde Slide – Moonlit Mistletoe – in grey, silver and green. It’s a true unisex fragrance, the top notes are herbal, green and fruity, balanced with spices, amber and patchouli.
November’s challenge over on Amy Warden’s Great Cakes Soapworks was to (attempt to) recreate what Amy named the ‘Tall & Skinny Shimmy’. This technique is also called the wall pour or segment filling, and has been perfected by Tatiana Serko, an amazing soaper who created the tutorial video for the challenge. I’ve seen this design before and always wondered how it was done, SO there was no doubt in my mind as to whether I’d be giving it a go this month. Here’s the design she created for the tutorial:
Tatiana’s Tall & Skinny Shimmy
I recently bought a shiny new tall & skinny mould, and this challenge marked it’s first outing. This was the first problem. Turned out the mould holds more soap than my regular mold. I kind of thought it would, but checked on the website where I bought it to make sure. Unfortunately, in my haste, I looked at the wrong listing, and so had the wrong volume in my head. Luckily I’d had a sneaking suspicion that that figure might be incorrect (just by looking at the mould – which is LONG), so I prepped two batches of my masterbatched oils, just in case.
I decided (once again) to use a fragrance I’d not used before. Not as crazy as it sounds – I used a blend of Patchouli & Sweet Orange essential oils, both of which I’ve used separately many times without any problems.
I added the fragrance blend to the oils, then added the lye and mixed gently with a whisk until the soap was fully emulsified, but no more. In her tutorial, Tatiana said that she doesn’t use a stick blender, and simply lightly hand mixes her soap. With some trepidation, I decided to do the same, and split the soap into seven, colouring each portion a different shade, and mixing thoroughly by hand.
Prepped colourants
I then set up my mould as per Tatiana’s instruction. I placed two pencils parallel to each other on my work table, on either side of my mould. I put one side of the mould onto one of the pencils, so that there was a tilt to the mould, and then poured the first colour down and along the side of mould that was NOT on the pencil. I then moved the mould so that the other edge was sitting on the other pencil (and the mould was therefore tilted lengthways the other way) and poured down and along the opposite side. I did this with all seven colours, alternating the side each time. The soap was very thin, and had barely reached trace – I think it perhaps could have been just the tiniest bit thicker – note to self for next time…
Anyway, of course, it turned out I didn’t have enough soap made up to fill the mould, so I quickly separated out another three portions of the second batch, added colour, and continued to pour. The pouring was fast and fraught, and I didn’t get the opportunity to take any photographs – sorry!
Once the pour was complete, and the mould was full, I swirled to the top and put it to one side to harden up.
Tall & Skinny Shimmy in the Mould
As it was poured at such a light trace, it took a while to harden up sufficiently, but three days later I felt confident enough to take it out of the mould:
Ready for cutting
I was REALLY apprehensive about cutting this one, I didn’t have the time (or the ingredients) to make another one, so I was hoping it wasn’t a complete disaster. As it was, it’s not too bad. I did get a little bit of a shimmy, but there’s no doubt that the pouring left a lot to be desired!!
Tall & Skinny Shimmy (kinda)
I think had I had the correct volume of soap from the beginning, and just had the seven colours to pour, I may have had more luck – it’s clear that my scrabbling for more soap towards the end caused issues with the design at the top.
Another issue I had was that the silicone liner was so tall and long, it didn’t stay flush to the sides of the mould – the sides bent into the middle, and so while pouring down one side, I had to use my other hand to hold the other side of the silicone mold away from the middle, which was a bit awkward.
I’m really happy to have been able to give this one a go, and will probably try it again at some point in the future – thanks Amy!
Thanks for reading – I’ll be back soon with a post on my holiday soaps.
This Summer I was lucky enough to host an international soap swap between myself and eleven amazingly talented soaping friends from Europe, America & Canada. There was only rule: Each participant was to send me eleven full sized bar of their soap by 31st July, together with their postal address for the return package.
Once I had received all eleven packages (and boy was that like Christmas!!) I created twelve piles of soap – one for each participant including myself – consisting of one soap from each package (omitting each participants OWN soap of course) and one of mine. I then boxed up all the piles of soapy goodness and sent them back out to their rightful owners.
Given all the things that could have gone wrong, it all went remarkably smoothly. We had a bit of a delay as one box was a few weeks late arriving (despite being posted in PLENTY of time by the participant – it took almost 8 weeks to get from North America to the UK!) but the return packages all (bar one) arrived at their various destinations in good time, and even the last one arrived within 10 days.
The only down side really was the postage costs. The parcels weighed approximately 1.7kg each, so international postage both ways was never going to be cheap. Once I’d packaged up the individual boxes I weighed them at home, and used the Royal Mail website to try to ascertain what the cost was going to be to send out each parcel. Each participant then paid me via Paypal what I had estimated the cost to be. As it turned out, each and every parcel turned out to be marginally cheaper to post than the website quoted, but it was a simple task to refund each participant the difference.
And now to the fun bit. There were 6 participants from Europe (including myself) and 6 from the USA and Canada. Rather than have one crazy long post, I’m going to post a few pictures here of MY Christmas in July – when the soapy packages arrived. In Post 2 I’ll share my European haul in much more detail, and in Post 3 I’ll do the same with the loveliness from our friends over the pond.
In case you missed my earlier teaser, here’s the full line up in all its glory:
International Soap Swap 2015
If you are remotely a fan of handmade soap, or even just like surprises, you’ll have some idea of the excitement I felt each time the postman handed me one of these parcels. Do bear in mind these are just teasers for the main events coming in the next two posts!
First to arrive was this package from Pam of By The Sea Soaps in the US:
By The Sea Soaps
and she was so kind to put together a special goody bag for me as a thank you for hosting the swap:
Goody Bag from Pam
After that I’ve kind of lost track of what arrived when, so these next nine packages are in no particular order:
From Vinvela Ebony of dandelion SeiFee in Austria:
dandelion SeiFee
From Wendy of Soapy Jones, UK:
Soapy Jones
From Barbara of Moon Goddess Garden, US:
Moon Goddess Garden
From Melinda of Melinda’s Naturals, US:
Melinda’s Naturals
From Celine of i am handmade, Ireland:
i am handmade
From Wendy of Heavenly Bubbles, UK:
Heavenly Bubbles
From Zacil of Soap & Soap in Germany:
Soap & Soap
From Emily of Shieh Design Studio, US:
Shieh Design Studio
From Zahida of Handmade in Florida, US:
Handmade in Florida
And finally, an admission and apology – there was one parcel that, in my HUGE excitement, I forgot to photograph whilst still in its outer box. So, even more of a tease here from Louise, of Soga Artisan Soaperie, in Canada: (There will, of course, be pictures when I cover them individually in Post 3, and you can find them here if you can’t wait that long)
Soga Artisan Soaperie
Don’t, whatever you do, miss the next two posts. There will be naked bars 😀
This month’s challenge for Amy Warden’s monthly Soap Challenge Club over at Great Cakes Soapworks is to create a soap using the ‘Clyde Slide’ technique. The Clyde Slide is named after Clyde of Vibrant Soaps, who uses this technique to create beautiful (and exquisitely coloured) soaps – do check out his videos on YouTube if you get the opportunity.
As I’ve just started production of this year’s Christmas soaps, I decided to design my challenge soap around a fragrance oil called ‘Yule Log’. It’s a chocolately, almondy, cakey fragrance, with notes of cinnamon, ginger, vanilla and musk and is delicious out of the bottle. How does it smell in soap? I’d love to tell you but, um, well, I forgot to add it. Oh well, sensitive noses deserve pretty soap too don’t they?
I used a light brown mica as the base colour, to represent the sponge, and dark brown mica, titanium dioxide (white) and red liquid colourant for the cream, chocolate and holly berries elements. I did consider using a little green too for the holly leaves, but in the end I’m glad I didn’t.
I prepped the soap batter and added the colours, making sure I kept the batter at a light trace:
Coloured soap
Then I poured the white, red and dark brown soap batters into the bowl containing the lighter brown soap. I completely forgot to take a photo of this stage, but I used exactly this pattern (this was my second attempt):
Clyde Slide in the Pot
Usually, when I use the ‘In the Pot’ technique, I would now give the pot a quick stir, just once or twice, but I always stir before pouring. For a Clyde Slide, you DO NOT stir. I can’t tell you how much I wanted to stir!!
Here it is mid-pour:
Clyde Slide mid-pour
Then I swirled the top:
Clyde Slide top swirl
And two days later, Ta Da!! My unscented Yule Log Clyde Slide:
Clyde Slide, The Cut
And here’s a close up to show the trademark ‘Clyde Slide’ feathering – it’s not a blurred photo, honest :-D:
Clyde Slide Close Up
Many thanks to Amy for her major feat of organisation (apparently there are over 180 entrants this month!), I’m really looking forward to seeing all the other entries. Good luck if you’ve entered!
I’m going to quickly gloss over how long it’s been since I last posted and share a soapy pic – ‘cos that’s what you’re here for right? 😉
Soap fragrance oils containing vanilla are often considered tiresome because of their propensity to discolour and potentially ruin a carefully designed soap. But they smell so good! I absolutely love the smell of ‘Pink Kisses’ from Gracefruit, but my first attempt at using it was a complete disaster. It was early on in my soaping career, and discolouration wasn’t even on my radar. I used a selection of pretty pink colours and was so excited to see what it would look like, so imagine my disappointment…
Looks ain’t everything!
Every failure’s a learning opportunity eh? 😀
Four (!!) years on and I decided to give it another go – this time I was a little more careful with my design. Splitting the batter into two, I coloured one half with Orchid Pink Mica, and added the fragrance oil to the other other portion only, adding a little Titanium Dioxide to mitigate the effect of the vanilla. This was the result:
First Kiss
Needless to say I’m so much happier with this one. I think the browning effect of the vanilla actually improves the look of the bar and gives it some depth and interest.
I hope you’ll agree that my photography skills have improved a little too 😀 😀 😀
Despite signing up for them at every opportunity, it’s been an awfully long time since I’ve managed to get round to make a soap for Amy Warden’s monthly Soap Challenge Club over at Great Cakes Soapworks. This month’s challenge really piqued my interest though, and I was determined to give it a go. The challenge was to create a soap using the Spinning Swirl technique (which I hadn’t come across before) and, after months of making nothing but restocks, I was keen to try something a bit different. This technique involves pouring very fluid soap batter into a slab mould and then spinning the mould itself. Amy provided a great video tutorial, and this one of the soaps that she made to illustrate the technique:
Amy’s Spinning Swirl Soap
One of the stipulations of the challenge was that the soap had to made in a slab mould, which I don’t own. So my first challenge was to improvise a slab mold. A shoe box did the trick:
Improvised Shoe Box Mould
I prepared my colourants. The fragrance oil is described as a creamy, powdery, honey fragrance, and I wanted warm colours to reflect that. I used Radiant Gold mica, Sicilian Orange mica and Red iron oxide and mixed them with a little of the oils (to which I’d already added the fragrance).
Colourants mixed with a little oil from the main batch
I added the lye to my usual oils and butters, and then poured the batter equally into the three jugs, stirred well then stick blended very VERY briefly (as I needed it to stay fluid for as long as possible):
Soap ready to pour
I poured the soap into the mould, alternating colours in a faux-funnel type pour:
Soap mid-pour
Once the soap was all poured, I gritted my teeth, gripped the mould with both hands, and started to rotate the mould as quickly and as firmly as I dared while praying that it wouldn’t all slosh out onto my table. After making probably about 20 full rotations, I swirled the top with a skewer and put it aside to firm up. A couple of days later I unmolded and found this left behind in the diy mould:
Leaked soap!
THAT is why I love my silicone moulds so much 😀 Anyway – the unmolded soap didn’t look too promising:
Unmoulded Spinning Swirl
Not only do I not have a slab mould, I also don’t have a cutter that can cope with a big ole slab of soap, so I had to make the first cuts with a Very Big Knife. Needless to say, I wasn’t particularly accurate:
First cuts – Spinning Swirl
And THAT is why I love my single wire Bud cutter 😀 Anyway, I was able to use my beloved cutter for the rest of the cuts:
Final cuts – Spinning Swirl
And, after a little love and attention, I’m really happy with the result:
Spinning Swirl Soap
Many thanks Amy for organising the challenge! It was a real pleasure to try something new and I’m looking forward to seeing what the other entrants come up with.
Thank you so much to everyone who came up with wonderfully inventive names for my new soap, both here and on my Facebook page. It’s taken me a couple of hours of deliberation, but we have a winner. Now this is a little convoluted, so bear with me!
I was looking for a name that reflected both the fragrance (pink grapefruit, kumquat, orange and cranberry mingled with gardenia, jasmine, and freesia) AND the design, and I wasn’t entirely sure that any of the suggested names quite hit the mark. However, three people made suggestions that led me to come up with the name I’ve finally gone with. Firstly, two people (Soap N’ Stilettos & Ewenique) suggested names that included the word ‘Sunrise’ which I think nicely reflects the design. I also wanted to convey something of the fragrance, albeit indirectly, and Gunilla Stoll (who suggested Tuscan Summergarden) gave me the idea of including a place known the world over for growing citrus fruit (especially grapefruit and kumquat – happy days!) Florida.
I used Random.org to choose a winner from the three entrants above – numbering them 1 – 3 in the order in which they posted on the blog post, and the winner was… *drumroll* Soaps ‘N Stilettos! Congratulations!! DM your postal address to my FB page here and I’ll send your soap out asap!
And finally, introducing: Florida Sunrise. Available now!
Florida Sunrise
Thank you once again to everyone who took the time to enter – I really do appreciate it! Keep an eye out for more giveaways coming soon.
In my last post (so much longer ago than I realised – life is busy :-D) I shared a picture of an as yet unnamed soap in the mould. Well, here it is, cut, fully cured, and STILL nameless – please help me name it!
Name me – please!!
The fragrance is described as pink grapefruit, kumquat, orange and cranberry mingled with gardenia, jasmine, and freesia. To me it’s mostly citrussy – there’s a hint of background florals but the citrus notes are definitely dominant. It’s coloured with titanium dioxide and yellow and tangerine micas.
I’m offering a free bar to the person who comes up with the name that I eventually choose, and you can either enter below in the comments field or on the competition post on my facebook page here. It’s open to anyone, wherever you are in the world – I’ll cover postage costs too. So don’t be shy – I know you’re a creative lot!!
PS – the winning name will be chosen on Easter Monday, 6th April, after 9pm UK time.
This website uses cookies to improve your experience. We'll assume you're ok with this, but you can opt-out if you wish. Cookie settingsACCEPT
Privacy & Cookies Policy
Privacy Overview
This website uses cookies to improve your experience while you navigate through the website. Out of these cookies, the cookies that are categorized as necessary are stored on your browser as they are essential for the working of basic functionalities of the website. We also use third-party cookies that help us analyze and understand how you use this website. These cookies will be stored in your browser only with your consent. You also have the option to opt-out of these cookies. But opting out of some of these cookies may have an effect on your browsing experience.
Necessary cookies are absolutely essential for the website to function properly. This category only includes cookies that ensures basic functionalities and security features of the website. These cookies do not store any personal information.
Any cookies that may not be particularly necessary for the website to function and is used specifically to collect user personal data via analytics, ads, other embedded contents are termed as non-necessary cookies. It is mandatory to procure user consent prior to running these cookies on your website.