Posted on 28 Comments

I missed one…

I don’t know about you, but I go daft for reading Soapy blogs. I use bloglovin, which I love because even though I don’t always get to read posts as soon, and as often, as I would like, it keeps me up to date with all my fellow soapy bloggers and I never miss a thing. In fact, it was fellow soaper’s blog that reminded me last week that I had actually missed something – I’d forgotten to post about my most recent Lavender soap.

Ruth Esteves over at The Sirona Springs Blog posted a great tutorial on creating Mica Oil Swirls on the top of soaps, and invited readers to link their own attempts in the comments section. So I though I would. Only I didn’t have anything to link to, ‘cos I’ve not blogged about it. <Ahem…>

So here it is – a reincarnation of Luscious Lavender, but with a mica oil swirl.  The soap itself is coloured with violet ultramarine, but the closest mica I had was ‘Patagonian Purple’, and it’s not really a good match colour-wise (at all, lol). Never mind – I love the effect anyway (and I’ve just placed an order for ‘Grape’ mica which I’m hoping will be closer to the ultramarine colour and more ‘lavender-like’ for future soaps 🙂

Pure Lavender Essential Oil with a Mica SwirlI didn’t take any photos of the process, but all I did was mix about half a teaspoon of mica in a small container with about a teaspoonful of olive oil, and then used a disposable pipette to drop the mixture all over the soap once it was in the mould. I then used a wooden skewer to create the swirls. Easy peasy 😀

If you have a soapy blog please feel free to share it in the comments below. If I don’t already follow you – I will!

Posted on 34 Comments

Taiwan Swirl

I’ve been on a bit of a self imposed soaping break recently, in preparation for ‘The Big Move’, and it feels like ages since I last made soap.  When Amy of Great Cakes Soapworks posted this month’s soaping challenge – the beautiful Taiwan Swirl – I decided  to sign up just to watch the tutorial and see how it’s done.   Anyhow, watching the video got me itching to make soap again, so, at the eleventh hour, I unpacked all the soaping gear (to raised eyebrows from my other half :-D) and gave it a shot.

The Taiwan Swirl calls for a really really thin soap batter, which I knew would be my first challenge. My usual recipe traces fairly quickly and wouldn’t be any good for this design. Amy suggested 80% Olive oil to 20% Coconut oil, so I ran that through SoapCalc and decided I’d like the final soap to be a bit more bubbly. I plumped for 70% Olive oil, 20% Coconut oil and 10% Castor oil. Some of you will have spotted the obvious mistake already – guess who totally forgot that Castor oil can speed up trace?

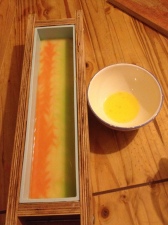
I mixed up a blend of Lemon, Clary Sage and Ginger essential oils to fragrance the soap, and chose what I hoped would be complementary green and orange micas for the colours. I dispersed the micas in about 15ml of Olive oil:

photo 1(2)

I had already made up the lye solution and melted/mixed the oils earlier in the day, so I had both at room temperature. I added the lye to the oils and briefly mixed with the stick blender to the point of a very VERY light trace.  Amy, in her video, suggested stopping as soon as the batter was emulsified and just before it traced, but I missed that window and definitely hit trace  🙂  I poured a very small amount (just over 100ml from a 750g batch) of batter into each jug of mica and poured the remaining batter into the mould. I knew I was running out of time as the batter in the mould was thickening so I quickly poured the coloured mixes into the base (from high, to get the colour down through the batter to the base – one down one side, lengthways, and the other down the other side). Both were poured at the same time, which proved challenging!

Then I swirled, using a skewer. The swirling is a bit difficult to explain without a diagram but here goes: Put the skewer into the mould, right down to the base, in one corner of the mould then make tight ‘s’ shapes from one short end of the mould, side to side down the length of the mould to the other short end. Then, keeping the skewer in the mould, make long ‘s’ shapes along the length of the mould – at 90 degrees to the first ‘s’ shapes. I hope that makes sense but if not there are some great YouTube tutorials on my Pinterest board here.

Anyone spot the next obvious mistake? Yup, I forgot to add the essential oil blend. Ah well, too late to do anything about it :-s

photo 2(1)
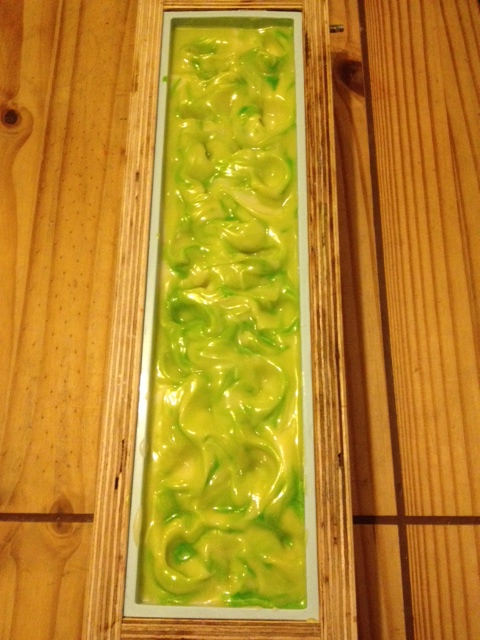
At this stage I was a little bit disappointed with what was in the mould – the swirls weren’t as fine as I’d hoped, and the green colour wasn’t very defined, but by the next morning it was looking better, and by the time I cut it I was pretty happy with the result….

Taiwan Swirl by The Soap Mine

It’s still pretty soft – I’ve never made a soap with such a high percentage of liquid oils before – and I think it’s going to need a good long cure time to get nice and hard. I really should have left it for at least 48 hours before cutting, rather than my normal 24 hours, but I was in a hurry to get this post finished, and a picture uploaded onto to Amy’s challenge web page before the deadline, so that’s what I’m off to do now 😀

Thanks Amy for another great challenge!
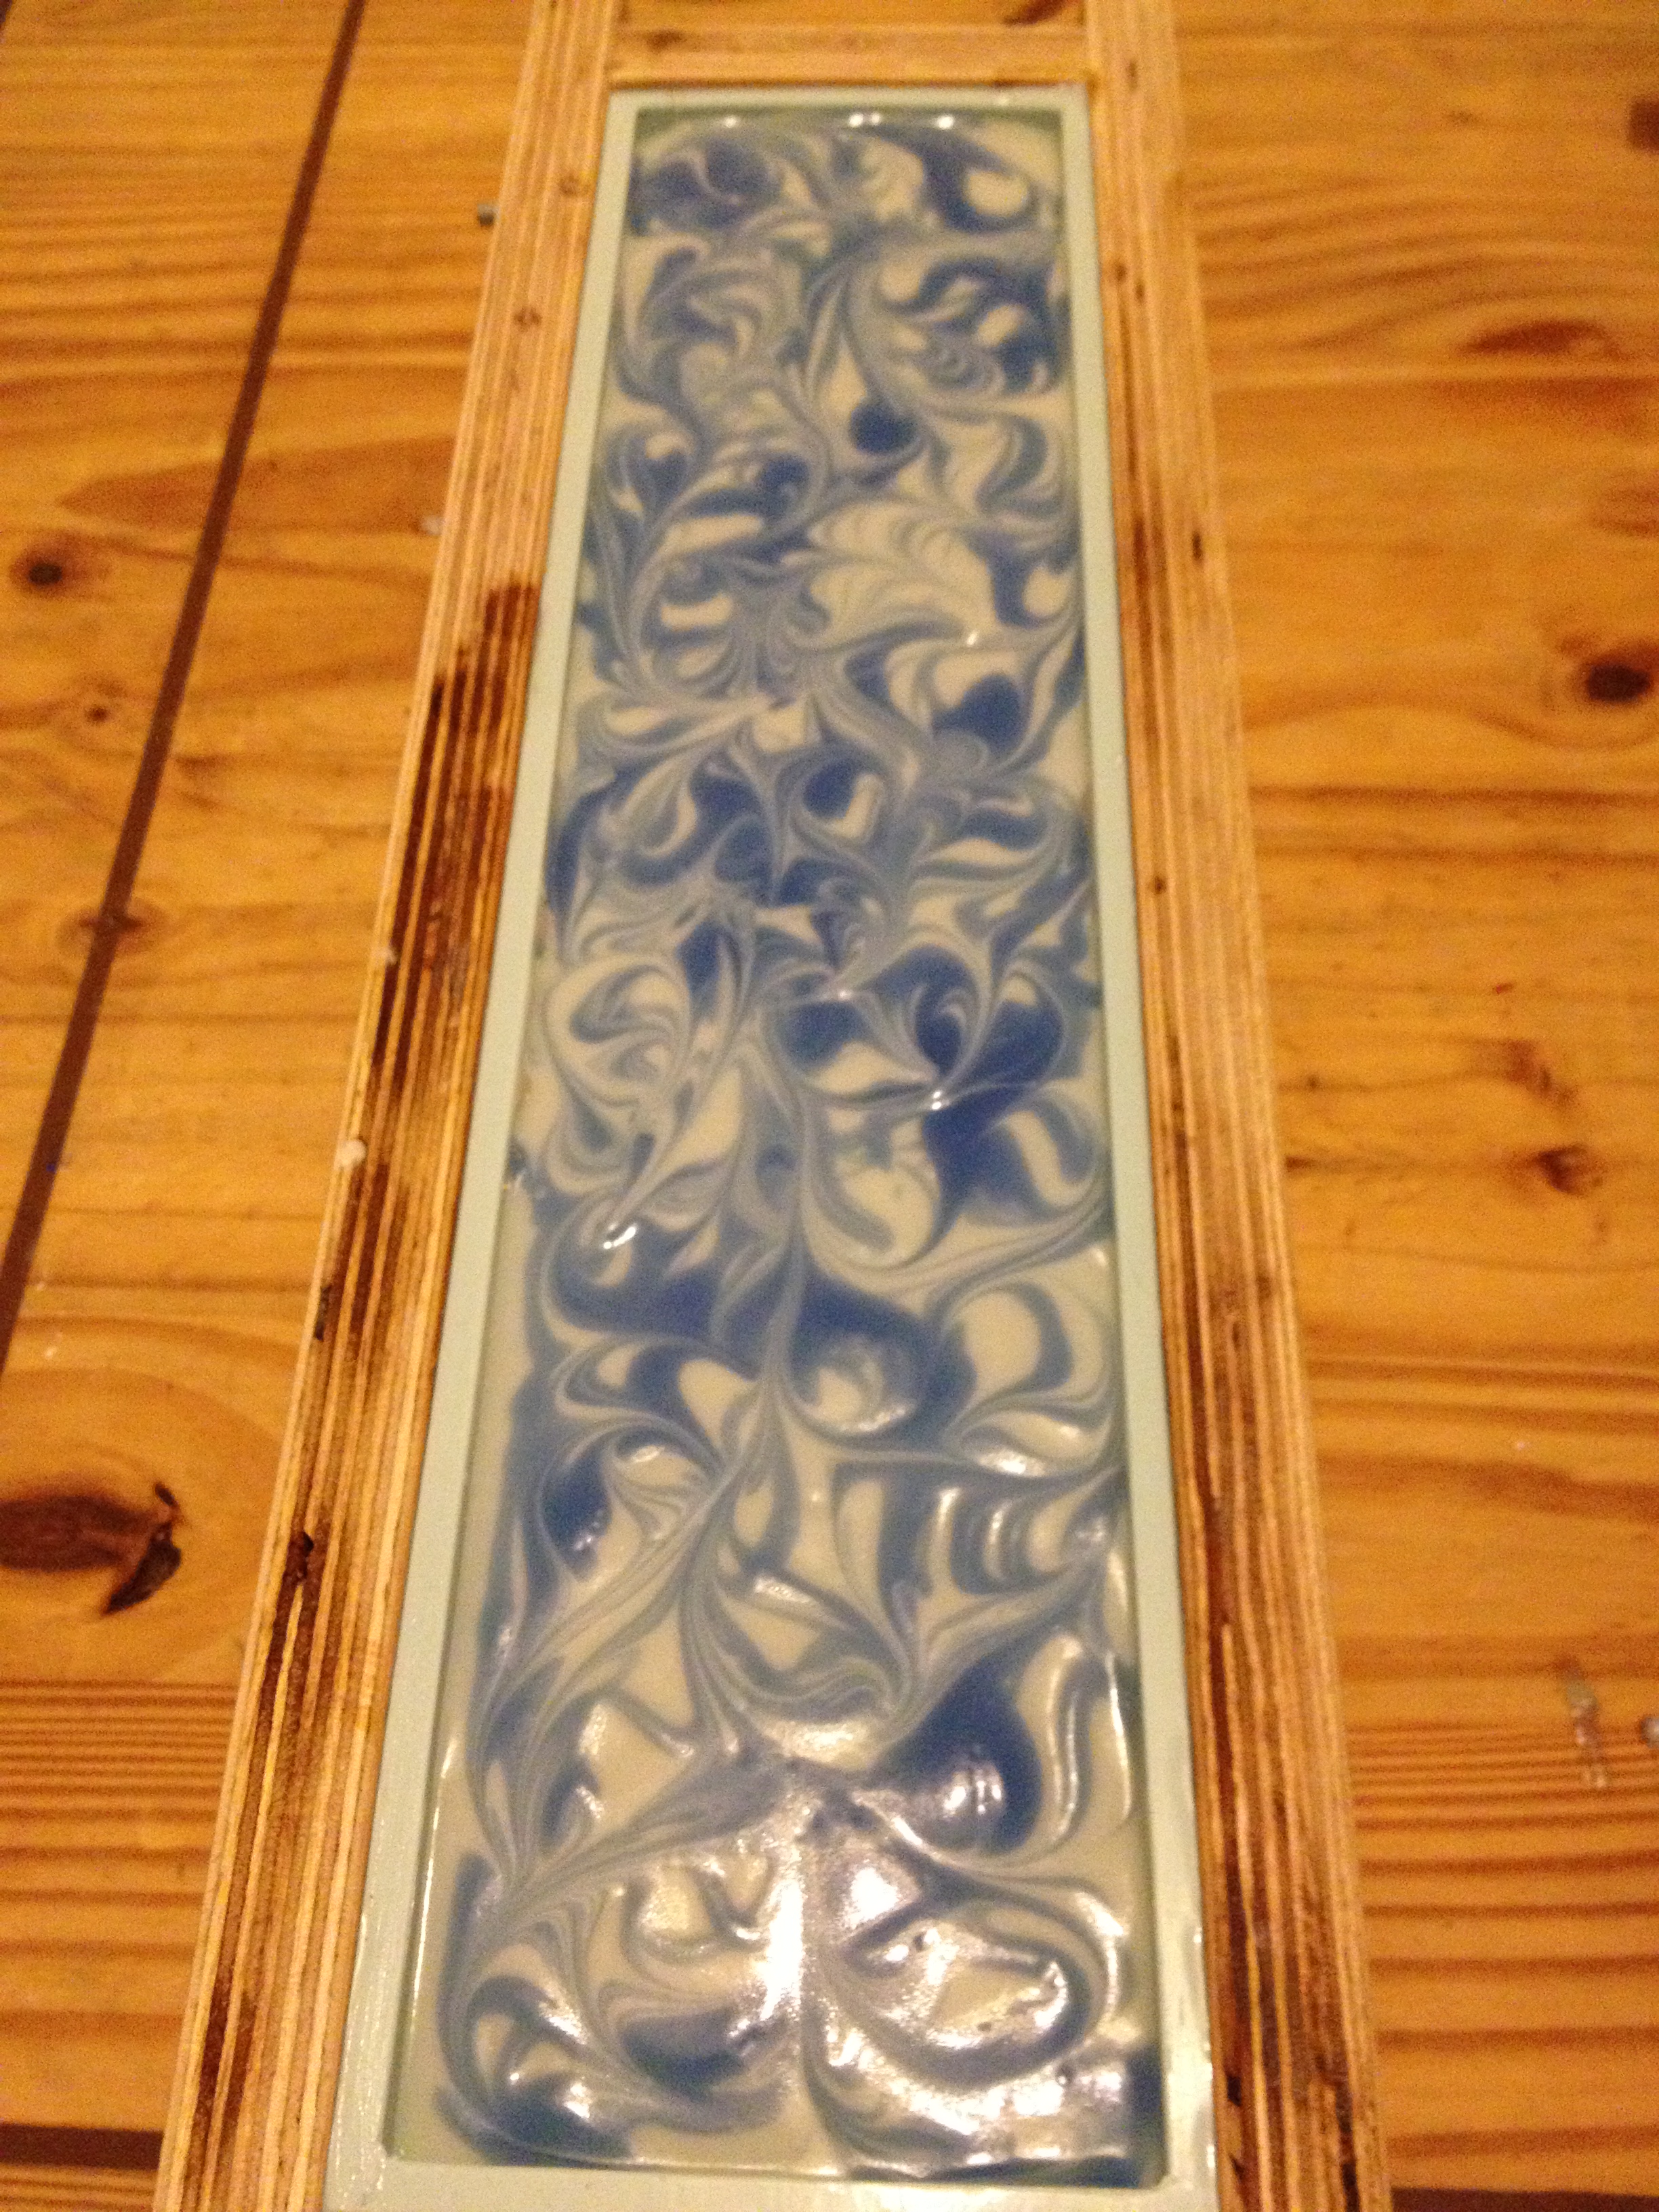
Posted on 12 Comments

Ooops…

I made this soap a couple of months ago and it’s been a surprisingly good seller, despite its rather ‘plain jane’ looks:

CP Soap - Serenity

Ordinarily I love my colours and swirls, and in my head this one was going to be a beautiful drop swirl design in shades of blue, a bit like this green one I made not so long ago…

Green drop

but it wasn’t to be…

I usually soap at room temperature. To that end I generally mix up my lye solution and melt my hard oils and butters during the baby’s midday nap, so that they’ve cooled down nicely by the time both kids are asleep in the evening. I also weigh out my liquid oils and add them to the melted oils as well – this starts the cooling process and also makes the ‘hard’ oils and butters less likely to re-solidify as they cool.

So on this occasion I prepped everything as normal, and once the bedtime routine was finished I eagerly set to work.  I combined the oils with the lye, added the essential oils (a blend of Bergamot, Patchouli, Orange and Ylang Ylang) then portioned out the batter and mixed in the colours (titanium dioxide, denim blue mica and ultramarine blue pigment). It was only after I’d poured all of the white portion into the mould that I realised that, even when I dropped in the two blues, I wouldn’t have anywhere near enough soap to fill the mould.

It only took a second or two for the penny to drop.   For some reason I had skipped a step at lunchtime, and hadn’t added the liquid oils to the melted oils.  My measured out liquid oils were still in a jug, put away safely to one side. Arrrgghhhhh! I couldn’t bear to waste a 3lb batch of soap, so did the only thing I could think of. All the mixed batter went back into a big bowl (oh the colours looked so pretty as I poured them in!) along with the liquid oils and I stick blended like crazy. The batter had originally behaved very well and traced beautifully (I’d had no indication that anything was amiss) so I had no idea whether it would work or not. I fully expected ricing, seizing or something equally frustrating but no, it all combined really well and I was able to pour my (by this stage) very plain, unicolour soap.

Despite everything, I’ve called it Serenity. The colour is very calming, and the fragrance blend is soothing and comforting. It’s funny how things turn out.

Posted on 8 Comments

Recent Makes

A very quick update with some recent creations.

First up is a restock of Luscious Lavender – an ‘In the Pot’ swirl fragranced with Lavender Essential Oil and coloured with Titanium Dioxide and Violet Ultramarine. It always surprises me how popular Lavender still is – this one’s already sold out!

Pictures 071

This next one is Orange Sherbert.  The batter thickened up VERY quickly but I still managed to do an ‘In the Pot’ swirl.  I really like the resulting folds, but I’m not sure I would ever be brave enough to try to replicate it as I was <this> close to getting the proverbial ‘Soap on a Stick’ :0) Fragranced with Orange Sherbet FO from Gracefruit and coloured with Titanium Dioxide and Orange Mica.

Pictures 264

Finally for today: Parisian Flowers.  A deliberately uneven layered soap, fragranced with a heady blend of Ylang Ylang, Rose Geranium and Lavender Essential Oils. Coloured with Titanium Dioxide and a range of pink micas, with a mica oil swirl on the top.

Pictures 270

Posted on 8 Comments

Colourful Camouflage

Another recent make:

Pictures 255

My original plan was to create a four colour version of the black and white soap in the header <up there> but it thickened up really quickly on me, and I had to work quickly to spoon it into the mould and swirl the top.

IMG_0551

It’s scented with “Jelly Beans” fragrance oil, a sweet, fruity fragrance that has held well, and really suits the colourful design.

Posted on 8 Comments

Drop Swirls

We finally had a bright day today so I took the opportunity to take some photographs outside – I’ve tried and tried to get decent pictures using my lightbox and artificial lighting but each time I fail miserably so it’s natural light all the way for me from now on!  (This could prove problematic in a North of England winter but I’m nothing if not an optimist 🙂 )

I recently tried something a little different – I’ve seen some beautiful drop swirl soaps on Pinterest, most notably by Tree Frog Soaps and Celine at I Am Handmade, and decided to give it a go. Celine very generously shares her methods on YouTube here so I spent a few happy hours watching soaping videos before I felt ready to make my attempts. Here are the first two:

Green drop

Aniseed & Orange DropI’ve also been experimenting with creating my own essential oil fragrance blends. Neither of these soaps have names yet, but the first one is fragranced with a lovely blend of Rose Geranium, Clary Sage and Lemon essential oils, and the second is fragranced with a totally delicious blend of Aniseed and Orange essential oils.

Posted on 7 Comments

Mold or Mould?

The differences between British and American English have been causing me some difficulties recently, specifically the words mold and mould.

Very soon after starting this blog I had to decide which to use. Mould is correct in British English, but American English and (so it seemed to me) the rest of the world use mold. Now, by a long shot, the majority of my readers are not British, so I went with mold. It didn’t sit well with me, and I really don’t know why I made that decision.  I’m British, so why wasn’t I consistent in my use of British English? I wouldn’t dream of writing color rather than colour.

Anyway, it was my mum (not mom 🙂 ) who drew my attention to the error of my ways. She just said, almost in passing ‘How do you spell mould?’ and I knew immediately what she was talking about. Once I got over the surprise realisation that she actually reads what I write (thanks mum!), I had a bit of a ponder, and did some googling.

According to the Grammarist.com:

‘American English has no mould, and British English has no mold. In other words, the word referring to (1) the various funguses that grow on organic matter or (2) a frame for shaping something is spelled the same in both uses, and the spelling depends on the variety of English.’

This much I knew.

However, it went on to say:

‘Australian and Canadian English favor the British spelling, though mold is fairly common in Canadian publications.’

This I did not know, and I was clearly wrong in my assumption that the rest of the world uses mold.

To cut a long story short, I will be using mould from now on, and thanks mum for prompting me to think this one through!

I’d love to know where you’re from and which spelling you use – please do leave a comment and let me know.

Oh, and because I know why people really read soapy blogs 😀 here’s some recent mould action:

Parisian Flora (Lavender, Rose Geranium & Ylang Ylang EO’s):

IMG_0533Magic Mojito (Spearmint & Lime EO’s):

IMG_0531and Jellybeans (FO):

IMG_0551Cut pictures to follow soon.

Posted on 20 Comments

Dandelion Zebra Swirl

This month’s soap challenge over at Amy Warden’s Great Cakes Soapworks is the Dandelion Zebra Swirl, created by Vinvela Ebony and named after her blog Dandelion Seifee. It’s not something I’ve done before, so was keen to give it a go.  It should look like this:

das-Zebra-Endprodukt-3

To create this design you need something like a flexible cutting board (which is what I used) cut to fit exactly inside the length of the soap mold.  Once half the base colour is poured, you insert the thin cutting board into the middle of the mold and pour alternate thin layers of the coloured batter down the cutting board. You then carefully remove the cutting board and pour the rest of the base colour (being careful not to disturb the coloured layers)

The reason for that rather convoluted description of the process is that I was concentrating so much that I completely forgot to take any ‘during’ photos <facepalm>

I have ‘before’ pictures:

3 colours

I have ‘after’ pictures:

photo 5But no ‘during’ photos.  Sorry :-s

Anyway, here it is: my first attempt at a Dandelion Zebra Swirl.  The green (chrome green oxide) and red (pigment) colours thickened up a little more than I would have liked, but the yellow (lemon drop mica) stayed nice and thin.  It’s fragranced with Apple Pie & Custard FO.

Pictures 221All in all I’m really happy with the way it turned out.  Thanks as always to Amy for organising the challenge, and I’m looking forward to seeing all the other entries!

Posted on 8 Comments

Hazelnut Soap

I’ve been wanting to make a hazelnut soap for a while, so recently I ordered a small amount of hazelnut oil and spent some time on SoapCalc working out a recipe.  I ended up using coconut oil, olive oil, palm oil, castor oil, shea butter and 17% hazelnut oil.

Pictures 212

I used a Hazelnut fragrance oil, and I knew that it would darken up the soap a fair bit, so I didn’t use any colourant for the bottom half, and added some titanium dioxide to the top half.  I love the simplicity of it, and it smells amazing!

Posted on 8 Comments

Market Set Up

September was my first month of regular markets, and it seems I’ve neglected my blog a bit – apologies!

I’m currently committed to three monthly markets – there are more out there that I could do, but I think I’ll wait until it all becomes a little easier (as it surely will when I’m more organised and the preparation becomes second nature) before I agree to do any more!

I did a bit of Pinterest research on the best way to set up my stall, but please tell me I’m not the only person to pin, pin, pin and then fail to go back and read it all, let alone implement any of the advice!! 😀 Still some work to do on that score  I think…

Anyway, I thought I’d post some pictures of my set up at the last two markets.

This was my stall last Saturday.  Tables were provided,  and were smaller than I expected, so I was careful not to make it look too crowded.  Notice the rubbish bin to the right of the picture?  Arrgghhh!! I persuaded the organiser to cover it with a tablecloth soon after this photo was taken!

1-Pictures 150The following day was a different market, and I had a dedicated gazebo area and a larger table. I tried to keep my booth as uncluttered as possible with boxes and other paraphanalia out of sight (those you can see in the picture belong to my neighbours):

1-Pictures 185The display stands are simply cardboard boxes covered with random fabric, but they do the trick:

1-photo 1

I know there’s probably a lot I could do to improve the look in general – some kind of backdrop would be good as a start.  Time to get back on Pinterest I think!

Posted on 26 Comments

It’s challenge time again!

This month’s soaping challenge over at Amy Warden’s Soap Challenge Club is a multi-coloured gradient soap. Now I’ve made gradient soaps before, but all of my previous gradient soaps have been one colour plus white, where the base is the main colour and subsequent layers gradually get lighter by adding increasing amounts of white soap batter.Ocean MistFor the challenge, Amy stipulated that we should use three colours (and no white, gulp!), so this was definitely stepping outside my comfort zone.  I decided to go with the primary colours, blue, red and yellow (though my red turned out decidedly salmon pink, but never mind….)

First I prepared my three colours – ultramarine blue oxide, lemon drop mica, and deep red mica (hmmm!), and tragedy struck!  OK, so that’s a bit of an overreaction, but my coffee frother, which I use to disperse the powdered colours, fell apart on me:

Picture 065Fortunately I’d already done the yellow and red, so I finished off the blue with a spoon and hoped for the best.

I then mixed the oils and butters with the lye, added the fragrance (a zesty lemon fragrance oil) and brought the mix up to a light trace. The main difficulty for me with this one was knowing how much of each base colour to start with.  I watched Amy’s video a few times, and realised that I had no idea how much a ‘cup’ was 😀 I decided just to eyeball it:Picture 066Then I started the pour.  A layer of just blue went in first – about a third of the ‘blue’ jug. I then added about a third of the red into the ‘blue’ jug, gave it a good mix and poured another layer. I added another third of red into the ‘blue’ jug and poured the lot into the mould to form the third layer.  The aim each time was to have straight layers which didn’t break into the layer below – I was partially successful I think…

I then poured a layer of just red from the ‘red’ jug. This was the fourth, or middle, layer:

Picture 067

I added about a third of the yellow soap in with the red, mixed and poured a layer. Then another third of yellow into the ‘red’ jug and poured again. The seventh and final layer was pure yellow – no wastage – yey:

Picture 070

After 24 hours I unmoulded and cut. I’m really happy with the result:

Pictures 011

I did find this one pretty challenging – I was working against a fast thickening batter towards the end, and wasn’t certain that I’d get all the layers done before the soap seized on me.  It was a great experience, but I’m not sure I’ll be making a multi-coloured gradient soap again any time soon :0D

As always, thanks go to Amy Warden of Great Cakes Soapworks for planning and organising the whole shebang!

Posted on 13 Comments

Soap flowers and cupcakes

I made some cupcake soaps this week. It’s been a looong time since I’ve made any, and I was fretting about how to decorate them.

My very first soap cupcakes were decorated with non-soap, regular cake decorations. They looked pretty, but not really practical 😀

Cupcakes 001 (2)

I moved on to piping decorations with leftover soap from other projects. Much more appropriate for bathing with, but I still wasn’t happy with the result:

030

So I had a root around Pinterest and found a tutorial for making soap roses here on the French SoapSession blog. I have a bit of French (but to be honest the pictures speak for themselves) so I gave it a go. I didn’t think to take any photos (oops!) as I made them but here’s what I came up with:

Picture 046As it turned out I felt my cupcakes looked good enough ‘naked’ this time, and so chose not to add any extra decoration:

Picture 048But I did use a couple of flowers on some ‘leftover’ soaps – so called because the bases were made from leftover cupcake batter (I’d run out the round cupcake cases and so dropped the leftover batter into a couple of heart shape moulds) and the tops were made out of leftover cupcake frosting (just glooped and swirled on top) I thought a couple of pink flowers would look cute on top. What do you think?

Picture 055

Posted on 7 Comments

Stocking up for market

I’m still busily building up my stock levels for the fast approaching farmers’ markets.  The first is only a fortnight away now, so the deadline for that one has passed  (I cure my soaps for a good 4-5 weeks before they’re ready to use) but there’s still plenty to do for the one after that.  I’ve committed to three markets a month for the time being, and I’ve no idea how many soaps I’ll need or how many will sell, so I’m stocking up and time will tell!

Here’s a round up of the last week or so:

Pink Matilda – Pink Musk Fragrance Oil

Picture 062

Smiling Zebra – Tangerine Fragrance Oil

Picture 049

Rosemary & Peppermint Essential Oils

Picture 052

Second attempt at the Holly Swirl, Maraschino Cherry Fragrance Oil

Picture 054Vanilla Cupcakes – Vanilla Fragrance Oil (in base)

Picture 048The second and third markets are at the end of September, so I’ve got a few more days to squeeze in another soaping session or two :0)

Posted on 4 Comments

Yet another confetti soap

I liked my first confetti soap so much that I think I got a little obsessed with making them. This was the second, and here’s the third, and final (for now!) confetti soap:

soap 010

This one was made with brown coloured gratings from amber glow and chocolate vanilla truffle and fragranced with a blend of cinnamon, patchouli and bergamot essential oils. It smells gorgeous 🙂

Here’s the full set of three:

soap 020

Now to crack on with stocking up for the upcoming farmers’ markets – more of which soon!

Posted on 1 Comment

A second confetti soap

The second in a series of three confetti soaps:

soap 012

These were inspired by the need to find a use for some really ugly soap – see the first one here, and I think they look really pretty.

This version is made with shades of pink and purple and is fragranced with a blend of Lavender essential oil and Marshmallow fragrance oil.

On sale 8th September from www.facebook.com/TheSoapMine

The final soap in the series will be posted very soon.

Posted on 34 Comments

Challenge Soap – Holly Swirl

Who wants to learn the Holly Swirl? I have to confess that up until very recently I’d never heard of the Holly Swirl – it’s a ‘swirl within a swirl’ and so called because it was first created by Holly Bailey of Missouri River Soap Co. It’s also the technique featured in this month’s Soap Challenge Club (the results of last month’s challenge can be seen here). This is one of Holly’s beautiful soaps:

holly-swirl

Having registered and watched the online tutorial I set about creating my own version.

Starting with a batch of my basic soap batter, I took out just under a half, coloured it with a pink oxide and poured it straight into the soap mould. I then split the remaining half of batter into two and coloured one portion with blue ultramarine oxide and the other I whitened with titanium dioxide. I put a small amount of the blue and white to one side to create the top of the soap later.

Now for the first swirl.  Using a jug I poured the blue soap batter into the bowl holding the white soap batter, holding the jug up high and slowly moving it around. No stirring, no mixing – that was the swirl done. I didn’t take a photo of this stage so I hope that bit makes sense!

And the second swirl: I poured the combined blue and white batter along the length the mould, from a height. This was a little tricky as I wanted it to penetrate deep into the pink, but not so much that it settled on the bottom of the mould.  It was, to be honest, an educated guess 🙂

photo 2 (9)

I then carefully topped the soap with the remaining white batter, drizzled over the blue, and gave it a swirl:

photo 3 (9)

After 24 hours I took the soap out of the mould:

020

And cut it:

soap 001

I’m really happy with how it’s turned out.  If I did it again I’d probably use more vibrant colours to better show off the lovely swirls, but not bad for a first attempt I reckon!  Oh, and it’s fragranced with Vanilla Bean from Gracefruit – it’s supposed to be non-discolouring so hopefully the colours will stay true…

Thanks are due again to Amy Warden of Great Cakes Soapworks for setting up and hosting the challenges – I’m having a ball 😀

Posted on 6 Comments

Ugly soap come good

Remember the failure (or two!) I had a few weeks back while making the Mantra Swirl soap? I wanted a way to use up some of that not-so-pretty soap and this is what I came up with:

Mandarin & Patchouli 002

First I grated up a whole load of the red and green portions of the ugly soap, then made up some soap batter and fragranced it with a blend of Patchouli and Red Mandarin essential oils. I then split the batter into two equal halves, then split one of those halves in half again to give me three portions of soap – one half and two quarters.  I added all the soap gratings to the larger half portion, mixing it gently but thoroughly to make sure there were no air pockets in there:

photo 2 (8)

Next I poured one of the quarters of soap batter into the mould, then slowly started to add the gratings mix:

photo 3 (8)

Finally I added the last quarter of soap over the top of the grated mix, and gave it some texture:

photo 2 (10)

This is the soap immediately after cutting.  The small bars at the front are the two end pieces cut up for samples:

photo 5 (7)

I’m so pleased with it that I’ve decided to make it the first in a series of three. The second has just been made and will be revealed very soon. The third is still in planning stage but will be made this week.  Keep an eye out for updates!

Posted on 2 Comments

A new mould (and its christening)

This week my fab new mould arrived, and I LOVE it:

photo

To date I’ve been using a  wooden mould that my husband made for me.  It’s served me well BUT I have to line it with freezer paper each and every time I want to use it.  This not only takes up valuable soaping time (it always seems to take ages) but I never seemed to be able to get the corners of my soap square – here’s a particularly good (bad?!) example <blush>

031-001

So what luxury to have a mould already furnished with a silicone liner!  I used it for the first time this week and it was such a pleasure to be relieved of the tedium of mould lining, not so mention the time saved (at least 20 minutes) – hooray!

It was christened with a batch of Wild Berries:

Wild Berries Mould

Cut pictures to follow soon

Posted on 3 Comments

Coconut Swirliness

Finding time to make soap (and write about it!) isn’t easy with a 3 year old and a 3 month old in tow, so I’ve resolved to make a minimum of one batch a week – at least until stock is back up to a respectable level.

Last week’s soap was a black and white swirled soap with a vanilla coconut fragrance made with olive and coconut oils and loads of shea butter. After the challenge of the Mantra swirl I decided to go with a simpler design:

Black & White Coconut 005

It needs a good five weeks curing time to harden it up, and will be released for sale on 18th August.

Now the fun bit…….planning this week’s soap 🙂