Posted on — 4 Comments

Parisian Flora

The last few weeks have been full-on soapmaking to restock the shelves depleted by the pre-Christmas rush. I only have two loaf moulds, and can only soap in the evenings once the little Miners are asleep, so it’s a fairly long drawn out process involving nightly soapmaking (what a shame :-D!) but I’m getting there.

This is Parisian Flora. A drop swirl fragranced with a blend of Lavender, Ylang Ylang and Rose Geranium essential oils, and coloured with titanium dioxide and micas.

Parisian Flora in the mould
                 Parisian Flora in the mould
Parisian Fora
                    Parisian Flora
Posted on — 14 Comments

Makeovers (2: Wake Up!)

Wake Up! was the first soap that I ever made using a blend of essential oils, way back in early 2010. Up until then I’d used fragrance oils in soap but, despite having an interest in aromatherapy, I’d never tried blending oils myself. Oh how things change! It’s a simple but refreshing mix of Peppermint and Rosemary essential oils – perfect for waking up the senses in the morning shower. While the fragrance blend has stayed the same since that time, it was a couple of years before it got its true name. Up until some point in 2012 it went by the predictable, if uninspiring, ‘Peppermint & Rosemary’.

This is the very first :

1st Incarnation of Peppermint & Rosemary - now known as Wake Up!
1st incarnation of Peppermint & Rosemary – now known as Wake Up!

I quite like the sprig of mint used there as a prop, but the least said about the background the better!

It wasn’t long after the above photo above was taken that I acquired my very first loaf mould (from The Moulds Shop – highly recommended btw), and my soaps became a more uniform shape and size.  For a while I was obsessed with the Tiger Swirl, and Wake Up! looked like this:

2nd incarnation of Wake Up!

Interestingly, it’s only now that I realise that I hadn’t started bevelling the edges at this point – something I always do these days.

These days Wake Up! looks something like this:

Wake Up! from The Soap Mine
3rd incarnation of Wake Up!

Currently all my essential oil soaps are made using the Drop Swirl technique, as I wrote about here. Sometimes they have textured tops, sometimes mica swirls, but they are always (for now!) Drop Swirls.

I’m really enjoying looking back over old designs, so please bear with me in the short term while I indulge myself with these makeover posts – I will try to intersperse them with some other stuff as well 😀  Thanks for popping by!

Posted on — 14 Comments

Makeovers (1: Serenity)

Quite a few of my soaps have had a makeover recently. No matter that I have (more or less) a set range of fragrances & designs, there’s always room to improve and to flex those creative muscles.

One of the most popular essential oil soaps that I sell is Serenity. The fragrance is a blend of Bergamot, Patchouli, Orange and Ylang Ylang essential oils.  The very first time I made a full batch of this one I carefully weighed out the appropriate amount of essential oil blend for the amount of soaping oils used, then put it to one side.  I then split my batter into three, coloured one white and two different shades of blue, then poured the soap into the mold, creating what I fully expected to be an awesome drop swirl. Except I’d forgotten to the add the fragrance. Argghhhh! There was nothing to do but scoop it all out, thoroughly mix in the essential oils, and put the whole lot back into the mould. Of course I ended up with a very plain, pale blue bar of soap which smelled amazing but looked nothing like my original plan:

Serenity Take 1
First incarnation of Serenity

The next few times I made Serenity, I decided to go with a single colour drop in a paler background.  Most of my drop swirls up to this point had been a white soap with coloured drops, but I wanted to try something a little different.  Here I used Icelandic Blue mica for the base colour and Denim Blue mica for the drop:

The second incarnation of Serenity
Second incarnation of Serenity

I used that design for a while, and it sold well enough, but it didn’t wow me, and last year I decided it needed updating.  The current Serenity has a base of Icelandic Blue mica, and drops coloured with Titanium Dioxide and Blue Dragon mica. I think it’s rather pretty and goes well with the name, so this design will be staying (for now anyway :-D)

Third incarnation of Serenity


Posted on — 2 Comments

2014 in review

The WordPress.com stats helper monkeys kindly prepared a 2014 annual report for my blog, and it made for quite an interesting read (for me anyway :-D)

I was quite surprised at how few posts I’d written last year, though moving out of our home, into temporary accommodation for 6 months, and then into our new place did place restrictions on the amount of time I had to soap, and hence write about it, so it figures.  I’m planning on posting a lot more often in 2015!

Despite the low number of posts during 2014, I’m really pleased to have had over 8,000 views, though not at all surprised at where the most traffic came from.  Very nice to see a summary of the most prolific commenters too (thank you so much ladies :-D). I love getting feedback, and it’s another of my blogging goals this year to stop by, say hi, and generally comment on other people’s blogs even more often than I already do.  If I’ve not already discovered your blog, please feel free to leave a link in the comments below and I’ll check you out!

Thanks for reading – back soon 😀

Here’s an excerpt:

The concert hall at the Sydney Opera House holds 2,700 people. This blog was viewed about 8,300 times in 2014. If it were a concert at Sydney Opera House, it would take about 3 sold-out performances for that many people to see it.

Click here to see the complete report.

Posted on — 5 Comments

Happy New Year!

Just checking in quickly to wish you all a very Happy New Year, and to say thanks for reading during 2014!

I’ve got a lot of plans for 2015, not least of which is to try to blog more regularly, so I look forward to sharing more soapy adventures with you over the next 12 months.

Vicki x

Happy New Year 2015

Posted on — 14 Comments

A Daffodillian Disaster

Daffolidish? Daffodilesque? Daffolidic? I don’t know, answers on a postcard please 😀 What I DO know is that I won’t be soaping with Daffodil fragrance oil again any time soon!

It’s been a while since I participated in one of Amy’s challenges over at Great Cakes Soapworks so I decided to give the December challenge a shot. ‘Cos of course I’m not really really busy with Christmas Fairs at the moment, oh no, not me…

Having decided to sign up for the challenge (which, by the way, I have done for the last goodness knows how many months but not actually managed to make anything in time) I also signed up for a new idea Amy’s organised, a Soap Swap. I really love trying other soapers’ creations, but if I’m honest I think my main motivation for signing up was to make sure that I actually entered the challenge. Once I’d commited to swap my soap with another contestant, I knew I couldn’t just ‘not get round to it’.

The challenge this month was to make a soap using the spoon swirl method. This is something I’ve done many times before, and which I knew needed no fancy equipment other than the usual, plus a spoon. And Amy’s excellent tutorial video confirmed that yes, I did indeed already know how to do this one. So far so good.

I took a moment to decide on which fragrance to use. I didn’t want to use any of my regular range, as they have fixed designs, none of which is a spoon swirl. So something different, something that could, possibly, become part of the range if it turned out fantabulous. I opted for a delicious daffodil fragrance. First mistake. Using a new-to-me fragrance for a challenge / swap soap was not one of my greatest decisions.

I melted the oils and butters that needed it, then stirred in the liquid oils, and the fragrance oil. I chose three lovely micas which I thought represented daffodils perfectly, and combined them with a little of the melted fats. I know many soapers add the powdered mica directly into the soap and stick blend it in, and it works just fine. I keep meaning to try that but I guess I’m a little stuck in my ways!

Prepped Micas
Prepped Micas

I usually soap at room temperature, so I used some pre-prepared (water discounted) lye solution, and there you have my second mistake.  Knowing that floral fragrances have a tendency to accelerate, I really should have used the full recommended water amount.

Anyway, you can probably guess what’s coming. I slowly added the lye solution to the fats and immediately it started to thicken. There wasn’t a lot I could do but, knowing that I wasn’t going to get another opportunity to make a challenge soap by the deadline, I carried on, managed to get a bit of colour mixed in, and squished it into the mould.  I DID then spoon swirl it. I really did! If you look closely at the pic below you can see where the spoon moved within the mould, but it’s not really that clear 🙁

Daffodil Spoon Swirl (honest!)

Oh dear. My poor swap partner.  Sam – if you’re reading this, I will send you a bar of this one (it does smell lovely!!) but I’ll also send you one of my more successful soaps!

Posted on — 11 Comments

Soap Tops

I’m in full ‘Operation Christmas Fairs’ mode and have been for a good few weeks now. All my soapmaking has been restocks, and there is a LOT of time being spent packaging and labelling soap. Consequently there hasn’t been much opportunity for creativity so I’ve playing around with my soap tops and and trying out different styles and techniques. I mostly swirl the soap while it’s still fairly fluid, but I have tried letting the soap thicken up a bit and creating texture that way too.

I’ve tried mica in oil swirls:

Mica/Oil swirl
                       Mica/Oil swirl

Swirling the still very fluid soap with a chopstick/skewer (or similar):

Chopstick swirl
         ‘Chopstick’ swirl

Chopstick swirling at a slightly heavier trace:

Chopstick swirl
       Chopstick swirl

A more formal ‘mantra’ style chopstick swirl:

Mantra swirl
             Mantra swirl

Using a spoon to add texture to the top:

'Spoon' textured top
‘Spoon’ textured top

Adding grated soap to create some detail on the top:

Grated soap detail
Grated soap detail

A simple ‘splatter’ technique. This one looks really effective on the cut bars:

'Splatter' method
       ‘Splatter’ Method

Here’s one I made a few years back – Chocolate Cake – chocolate chocolate chunk embeds set amid piped ‘cream’ topping:

Piping  & Embeds
                      Piping & Embeds

There seems to be an infinite number of techniques and methods, and I’m looking forward to doing some more experimenting in the quieter post-holiday months ahead.


Posted on — 12 Comments

A Planning Failure

If there’s one thing I’m learning, as the business slowly grows, it’s that planning is everything. Actually, I hope I’ve learnt a lot more, but planning IS crucial. I like to cure my soaps for a full six weeks before releasing for sale, and trying to work out potential demand a good month and a half ahead of time isn’t always easy.  Last year I made two Christmas soaps, and I had a good deal more left after the Christmas rush than I would have liked. How popular do you think a soap called ‘Christmas cake’ is in January? Yup…

This year, I was determined to avoid the same mistake again, and decided to make just one Christmas soap. I chose my fragrance carefully, and opted for ‘Jewelled Cranberry’, described as a ‘festive berry fragrance of juniper berries, elder berries and cranberries with supporting notes of pine nuts, orange peel and crisp apple’ and supplied by Gracefruit.

Jewelled Cranberry
Jewelled Cranberry

I gave it the usual six weeks cure time then posted it on my Facebook Page stating that it was a limited edition. The response was as amazing as it was unexpected – all 15 bars were sold within 24 hours. So that was it, my whole Christmas offering sold out before the end of October!  I was thrilled of course, but also a bit frustrated, at myself, for not foreseeing this possibility. Yes, I could have made more, but by the time I’d ordered the fragrance, made the soap, and waited the requisite six weeks, I would most likely be too late for the Christmas shopping period, and would end up with a surfeit of holiday soap in January again.  Very poor planning from a business point of view, but a valuable lesson learnt for the future!

Oh, and that Christmas Cake soap? I changed the name and it sold rather nicely, thank you very much 😉

Have you made Christmas soaps this year? Please share your links in the comments – I’d love to see them!

Posted on — 12 Comments

All Hail the Soap Cutter

Ever heard of a ‘Bud’? In the context of soapmaking I mean, not as in the popular American alcoholic drink.  To be honest, unless you’re big into soapmaking, you probably haven’t.  If you ARE big into soapmaking, you may already have a Bud, or you may, like me, have craved a Bud for a long time. OK, a ‘Bud’ is a Soap Cutter handcrafted by the lovely Bud Haffner in the US.  I first came across Bud and his cutters a few years back, and have wanted one ever since. When I first started making soap I used a knife. A really big knife. I’m not sure I EVER succeeded in cutting a bar with right angles. I then progressed to using one of these:

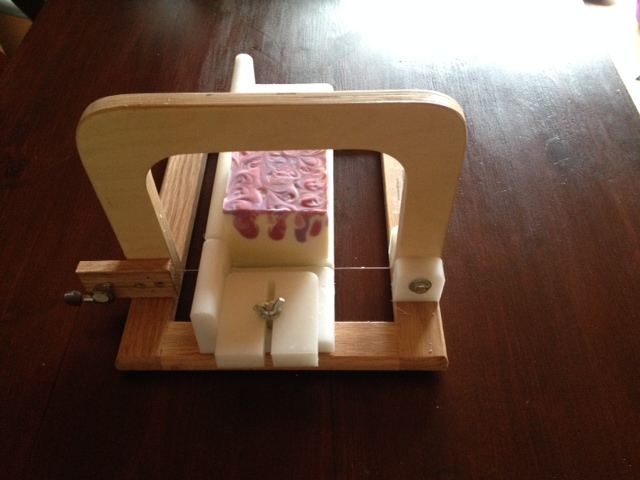
Yup. A cheese board with integrated wire. As mad as it sounds, it actually worked rather well, after a fashion.  It did at least cut cleanly and straight – but there was plenty of scope for user error.  Can you see the faint score mark just below the ‘cut’ line?  It was to there that I moved the end of the bar to after each cut, with a view to getting the same width bar every time. *Ahem* I’ll say no more about that.  The wire broke on a regular basis and replacements were hard to find and fiddly to replace *sigh* Since moving home to Wales the soap business has really taken off, and a good few months back I decided to bite the bullet and buy a bespoke soap cutter. I specifically wanted a single wire cutter, as a) I couldn’t really justify the cost of a multi-wire just yet and b) I really do still love that moment of discovery each time you cut a bar and see what you’ve got design-wise.  Anyway, I was really surprised to discover that I couldn’t find anyone in the UK selling them.  There were plenty of cutters that use a metal slicer like this one… …but only a wire cutter would do for me.  I also found a couple of UK based companies that sold multi-wire cutters, but I had my heart set on a single wire. So it was that, having heard many great comments and read some fantastic reviews about Bud’s soap cutters, I decided to order one from the US. Bud only seems to sell through Etsy, so I logged onto the site and bought my perfect single-wire soap cutter. Within hours I had a message from Bud to say he would be shipping the following day, and less than 2 weeks later it had arrived!  It’s extremely solid and well made, and an absolute pleasure to use.  Here it is in all its glory (here modelling this season’s ‘Parisian Flora’) :

And another shot from a different angle – just because I can

photo 2(2)

The bar width adjuster is simple and really easy to use:

photo 1(1)

I’m absolutely thrilled with my new cutter – for the first time ever all my bars are exactly the same width! It’s so easy to use, is beautifully made, and Bud provides excellent customer service. I’m already eyeing up one of the multi-wired cutters (affectionately known as a ‘tank’ within the soaping community) and, if the business grows as I hope it will, I fully intend to get one one day 😀

Posted on — 12 Comments

I’m back…

…definitely, absolutely, for good this time!!

I’m so sorry – the last two months have had so much going that I’ve struggled to find time to get on here to post, and then, over the last couple of days, I realised that I’ve  been putting it off as I didn’t know where to start. This is just a quick post to ‘break the spell’ as it were – I have loads more posts in the pipeline.

We finally moved! We’ve been in our new home for about 6 weeks now. It’s a ‘doer-upper’ and there really is so much to do, but it’s ours, it’s warm, it’s dry and we love it! Our eldest (4y) started full time school last month and has settled really well, and our youngest (18m) becomes more of a little monkey every day. Literally – she will climb, or attempt to climb, ANYTHING!

The soap business continues to grow, though with the little one demanding so much of my time I’m wary of committing to too much too soon.  My soap is now in 5 retail outlets, and I’m in discussions about another project. I did my first custom order of party favours recently, and the last craft fair I did was really successful. I’ve also put together my first ‘multi-item’ gift sets, experimented with piping, and invested in a new piece of hardware for the business – an amazing soap cutter imported from the US.  All good stuff and I’ll fill in the gaps in future posts.

And finally (because I refuse to post a photo-free update), I created my first exfoliating soap:

Super Scrubby Peppermint Soap
            Super Scrubby Peppermint

Oatmeal and ground apricot stones make this soap wonderfully scrubby – great for gardeners’ or mechanics’ hands. It’s fragranced with nothing more than pure peppermint essential oil, and simply coloured with a green mica. They’re not the prettiest bars I’ve ever created, but oh they do feel good on tired feet 😀

Posted on — 6 Comments

And The Winner Is…

A MASSIVE thank you to everyone who came up with suggestions for a name for my poor nameless orange & ylang ylang soap (as posted here) Facebook in particular turned out to be a particularly fertile creative arena and I do appreciate everyone who took the time to have a ponder and post something.

It wasn’t an easy decision – ‘Pheonix’ & ‘Desert Sands’ were serious contenders, but in the end I plumped for something a little more descriptive of the fragrance. And so, without further delay, I give you, ‘Orange Bliss’:

Orange & Ylang Ylang EOs
Orange Bliss – fragranced with Orange & Ylang Ylang Essential Oils

Orange Bliss was the suggestion of Candice Bond, who posted on our Facebook page here. Thank you and congratulations Candice – please message the FB page with your address and a bar will be winging its way to you!

Posted on — 3 Comments

Name That Soap…

Right folks, I need your help.

This recent addition to the range will be ready for sale in a very short while but remains nameless. It’s vegan friendly, palm free, is coloured with micas, fragranced with a blend of Ylang Ylang and x5 fold Orange Essential Oils and is made using the Drop Swirl technique.

Orange & Ylang Ylang EOs

If you’d like to try a bar for free, simply suggest a great name for it, and I’ll post a bar out to the person who comes up with the name I decide to go with. (Oh and I’ll be really, really grateful too – totally mental block on this one :-D)

It’s open to anyone worldwide, so don’t be shy – get those ideas in (either here or on the Soap Mine FB page where I’ll post this as well) by 8pm GMT on Friday 8th August and I’ll announce the winner later on that evening.

Thanks – I’m excited to see what you creative lot come up with!

Posted on — 6 Comments

My Soap Mountain is Growing

Well, I said I wouldn’t leave it so long next time and I’ve been as good as my word – only a month has passed since I last posted and I’ve awarded myself an end of term grade of C- for consistency. I think that’s usually considered a ‘Must Do Better’ grade 😀

I’ve not been idle though. The Soap Mine soaps are now being stocked in THREE retail outlets, and I’ve got my eye on another.  I’ve also been accepted to sell at a local monthly craft fair – the first of which is in just over 2 weeks time.  Soooo, I’ve been soaping like a demon. Originally it was to make sure I had enough for the launch of the website (and before you ask – nope!) but now I also need to make sure I’ve got enough for the three shops and the market – eeek!  I’m finding it quite hard to plan how many bars to make, given that I always work with a 6 week cure time, and I have no idea when, or how much, the retailers will reorder.  I suppose it’s not ‘Best Practice’ business-wise to work in such a way, but all three retailers are quite small concerns, and it would be difficult to get them to commit to taking, say, a set number of bars a month, until they’ve at least got some idea of how well (or otherwise!) they sell.

So, as the title says, my Soap Mountain is growing! My poor mum’s dining room (nope, we’ve not moved either!) has become a soapy storage area, and I’m constantly on the lookout for more storage crates, boxes and anything suitable I can get my hands on.

Anyway, these are some I made a few weeks back – I’ve got a lot more to share once I get round to photographing them!

Blackjack:

Blackjack CP Soap
Blackjack – Aniseed & Spearmint EOs

Chocolate:

Chocolate FO ITP Swirl

Orange & Ylang Ylang EOs:

(I’m struggling to come up with a name for the one so if anyone has any ideas I’d appreciate suggestions)

Orange & Ylang Ylang EOs

Serenity:

Notice the similarity between this one and Blackjack above? My mistake – I didn’t expect the darker blue in this one to be quite so dark, so the two bars are more alike than I wanted them to be.

Bergamot, Patchouli, Red Mandarin and Ylang Ylang EOs

Finally, just because I love it – a mica swirl on the top of my last batch of Luscious Lavender. Cut pictures to follow – eventually 😀

In the mould Lavender Mica Swirl
Lavender Mica Swirl

Thanks for checking in – especially those of you whose blogs I’ve not had the chance to catch up on for what feels the longest time – I’ll get back to you soon I promise!


Posted on — 11 Comments

A Quick Catch Up

So my poor blog has been sorely neglected again – six whole weeks since my last post!! I think that’s probably the longest I’ve ever gone without posting, so I’ve had a word with myself, am suitably chastened, and will not be leaving it so long again 😀

Ok, lets get the inevitable out of the way.  No, we’ve still not moved into our new home, and no, the website isn’t ready yet. Both still trundling along though, so I should be able to share good news on both fronts at some point 😉

The great news is that two local retail outlets have now agreed to sell The Soap Mine soaps. Woop!  They’ve each taken a dozen soaps to display in their shops, and if they sell, they’ll take more. Fingers crossed!!

I’ve been busy building up stock levels again – sticking to the plan of ITP Swirls for FO soaps and Drop Swirls for EO soaps I wrote about last time:

Welsh Rose
Welsh Rose (ITP Swirl)

Welsh Rose is actually made with an FO called English Rose, but living in Wales, what else could I call it?!  Coloured with TD and pink mica.

Oatmeal, Milk & Honey ITP Swirl
OMH (ITP Swirl)

OMH (or Oatmeal, Milk & Honey) FO is so popular in the soaping community, but this is the first time I’ve used it. To me it smells very sweet, almost like marzipan, and I LOVE it.  Coloured with TD and three different brown micas.

Wake Up! (Drop Swirl)

This is a restock of my very popular Wake Up! soap.  Fragranced with Rosemary and Peppermint EOs and coloured with TD and green / blue micas

Parisian Flora
Parisian Flora (Drop Swirl)

Another redesign / restock. Parisian Flora proved very popular in its last incarnation, so although the fragrance is exactly the same (a blend of Lavender, Rose Geranium and Ylang Ylang EOs), as are the colours (TD and three pink micas), it’s now made using the drop swirl technique

Luscious Lavender
Luscious Lavender (Drop Swirl)

Luscious Lavender, simply fragranced wth Lavender EO, is by far my biggest seller. It really surprises me to be honest, but there’s no doubt about it, when I look back over my records, Lavender is definitely the one that I’ve made the most often over the years. This one thickened up on me a little quicker than normal, so the drops aren’t quite as delicate as I would have liked.

I also have a Marshmallow FO soap that was cut this morning, and isn’t yet ready to meet its public 😀 and tonight I made Black Jack – a blend of Aniseed and Spearmint EOs. That one’s still in the mould, so pics to follow sometime soon.

Posted on — 16 Comments

A Range? Really…?

So, as work continues on my website (I know, I know, that’s another thing I’ve been banging on about for ever) my Web Designer and trusty assistant (aka my husband) has informed me that I need to develop ‘A Range’. Apparently I can’t keep making random batches of whatever I want to, with whatever ingredients / fragrances / colours I fancy trying and using a near infinite variety of design techniques. Nope, I need ‘A Range’…

Now I’ve read enough on Soap Business Best Practice over the last couple of years to know that this is true.  The main reason I guess is that I’ll lose business if I don’t have a range of bestsellers which are always in stock. I also think the website’s going to look a little crazy if there’s too much choice (and of course keeping a website up to date with an unlimited number of different products will be (I was told, sternly) a ‘nightmare’).

So, despite my misgivings, I’ve had to narrow things down a little and make some decisions.  I’m still going to make both Essential Oil soaps and Fragrance Oil soaps, though they’ll have their own separate categories, with no more than eight in each category to begin with.

To simplify things even further, Essential Oil soaps will all be made using the ‘Drop Swirl’ technique:


Enigma - Clary Sage, Rose Geranium and Lemon essential oils
Enigma – Clary Sage, Rose Geranium and Lemon Essential Oils


Spice Island - Aniseed and Orange Essential Oils
Spice Island – Aniseed and Orange Essential Oils

And Fragrance Oil soaps will be made using the ‘In The Pot’ (ITP) Swirl technique: (this first one is the soap that was in the mould in my last post – my first ‘post-move’ soap!)

Delicious - a dupe of the popular DKNY Be Delicious fragrance
Delicious – a dupe of the popular DKNY Be Delicious fragrance
Lemon Meringue - An intensely lemony yet sweet fragrance.
Lemon Meringue – An intensely lemony yet sweet fragrance.

The two techniques can sometimes look quite similar, and I might decide in time that that’s not such a good idea, but I’ll wait and see.

I’ll should still be able to indulge my creative streak as I’m hoping to make more seasonal soaps – I’ve missed a trick in the past by not making specific (for example) Christmas, Summer or Valentines Day soaps so that’s where I think I’ll be able to try out different fragrances and designs.

What do you think of my plan?

Posted on — 15 Comments

…and two months later…

Wow, I realised on Monday that it was exactly two months since I last posted on here.  TWO MONTHS!! I knew I’d take a bit of time out while we packed up our home and made the move to Wales, but I didn’t realise I would neglect the blog so thoroughly – so sorry!

Anyway, we’ve left the big city and are now settling into a much more rural way of life. This is the amazing view from my bedroom window:

photo 1

Not bad eh? We’re still staying with my mum, who has kindly allowed her peaceful home to be invaded by our family of four (thanks mum!) but we’re in the process of buying our new home – in the same village – yippee!

Needless to say the majority of our belongings are still boxed up and in storage and I’ve not been able to make soap BUT I decided last night that enough was enough – I had to get back to it. Mainly because a) I miss it, hugely and b)The Soap Mine is getting seriously low on stock…

So, I dug out all my soaping gear, whisked up a simple 3 colour ITP (in the pot) swirl (and oh oh oh loved every minute of it :-D):

photo 2(1)

  Delicious is scented with a dupe of DKNY’s Be Delicious fragrance, and smells utterly gorgeous. Coloured with two shades of green mica and titanium dioxide. Cut pics to follow soon.

Posted on — 30 Comments

Anyone for Embeds?

This month’s challenge over at Amy Warden’s Great Cakes Soapworks was to make a soap with embeds, ie soap with different shaped/coloured soap embedded within in it. One of the examples Amy used in her tutorial was this beauty:

Rise-and-Shine-soap

Isn’t it gorgeous?

I wasn’t going to enter the challenge this month as we move next week (are you bored of hearing about it yet? 😉 ) but I do like getting involved so decided to whip up something simple at the last minute, just so that I could take part.  I’ve already taken a peek at some of the other entries and there are some absolutely stunning creations, I’m a little embarrassed to post my little simple soap, but hey ho – I might win the booby prize :0)

Back in 2012 I made a soap that was really popular, called Bubblicious:

Bubblicious

and I thought it would be a quick and easy one to replicate for this challenge.

So I made up two small batches of soap and coloured one pink and one lilac. After about 24 hours I unmoulded them and started to roll different sized balls out of both colours:

Soap balls

This soon became ridiculously laborious and I realised I could probably get exactly the same effect if I rolled lengths of soap like these:

Soap sticks

I then made up a larger batch of soap and added titanium dioxide to make it nice and white. I fragranced it with a lovely floral blend of Rosewood and Ylang Ylang essential oils.

I then simply poured a small amount of soap into the bottom of the mould, laid some balls in and covered them with the white batter, then repeated until the mould was full, making sure I kept enough balls back to decorate the top of the soap. Voila:

Bubbles in the mould

And here are the cut bars:

Bubbles!

Very simple, but a nice effect nevertheless.  There are so many ways to play about with this technique, I’ll definitely be making many more embed soaps in the future.

Thanks, as always, go to Amy Warden for organising the challenge and giving us all an opportunity to drool over each other’s creations :0)

Posted on — 26 Comments

I missed one…

I don’t know about you, but I go daft for reading Soapy blogs. I use bloglovin, which I love because even though I don’t always get to read posts as soon, and as often, as I would like, it keeps me up to date with all my fellow soapy bloggers and I never miss a thing. In fact, it was fellow soaper’s blog that reminded me last week that I had actually missed something – I’d forgotten to post about my most recent Lavender soap.

Ruth Esteves over at The Sirona Springs Blog posted a great tutorial on creating Mica Oil Swirls on the top of soaps, and invited readers to link their own attempts in the comments section. So I though I would. Only I didn’t have anything to link to, ‘cos I’ve not blogged about it. <Ahem…>

So here it is – a reincarnation of Luscious Lavender, but with a mica oil swirl.  The soap itself is coloured with violet ultramarine, but the closest mica I had was ‘Patagonian Purple’, and it’s not really a good match colour-wise (at all, lol). Never mind – I love the effect anyway (and I’ve just placed an order for ‘Grape’ mica which I’m hoping will be closer to the ultramarine colour and more ‘lavender-like’ for future soaps 🙂

Pure Lavender Essential Oil with a Mica SwirlI didn’t take any photos of the process, but all I did was mix about half a teaspoon of mica in a small container with about a teaspoonful of olive oil, and then used a disposable pipette to drop the mixture all over the soap once it was in the mould. I then used a wooden skewer to create the swirls. Easy peasy 😀

If you have a soapy blog please feel free to share it in the comments below. If I don’t already follow you – I will!

Posted on — 32 Comments

Taiwan Swirl

I’ve been on a bit of a self imposed soaping break recently, in preparation for ‘The Big Move’, and it feels like ages since I last made soap.  When Amy of Great Cakes Soapworks posted this month’s soaping challenge – the beautiful Taiwan Swirl – I decided  to sign up just to watch the tutorial and see how it’s done.   Anyhow, watching the video got me itching to make soap again, so, at the eleventh hour, I unpacked all the soaping gear (to raised eyebrows from my other half :-D) and gave it a shot.

The Taiwan Swirl calls for a really really thin soap batter, which I knew would be my first challenge. My usual recipe traces fairly quickly and wouldn’t be any good for this design. Amy suggested 80% Olive oil to 20% Coconut oil, so I ran that through SoapCalc and decided I’d like the final soap to be a bit more bubbly. I plumped for 70% Olive oil, 20% Coconut oil and 10% Castor oil. Some of you will have spotted the obvious mistake already – guess who totally forgot that Castor oil can speed up trace?

I mixed up a blend of Lemon, Clary Sage and Ginger essential oils to fragrance the soap, and chose what I hoped would be complementary green and orange micas for the colours. I dispersed the micas in about 15ml of Olive oil:

photo 1(2)

I had already made up the lye solution and melted/mixed the oils earlier in the day, so I had both at room temperature. I added the lye to the oils and briefly mixed with the stick blender to the point of a very VERY light trace.  Amy, in her video, suggested stopping as soon as the batter was emulsified and just before it traced, but I missed that window and definitely hit trace  🙂  I poured a very small amount (just over 100ml from a 750g batch) of batter into each jug of mica and poured the remaining batter into the mould. I knew I was running out of time as the batter in the mould was thickening so I quickly poured the coloured mixes into the base (from high, to get the colour down through the batter to the base – one down one side, lengthways, and the other down the other side). Both were poured at the same time, which proved challenging!

Then I swirled, using a skewer. The swirling is a bit difficult to explain without a diagram but here goes: Put the skewer into the mould, right down to the base, in one corner of the mould then make tight ‘s’ shapes from one short end of the mould, side to side down the length of the mould to the other short end. Then, keeping the skewer in the mould, make long ‘s’ shapes along the length of the mould – at 90 degrees to the first ‘s’ shapes. I hope that makes sense but if not there are some great YouTube tutorials on my Pinterest board here.

Anyone spot the next obvious mistake? Yup, I forgot to add the essential oil blend. Ah well, too late to do anything about it :-s

photo 2(1)At this stage I was a little bit disappointed with what was in the mould – the swirls weren’t as fine as I’d hoped, and the green colour wasn’t very defined, but by the next morning it was looking better, and by the time I cut it I was pretty happy with the result….

Taiwan Swirl by The Soap Mine

It’s still pretty soft – I’ve never made a soap with such a high percentage of liquid oils before – and I think it’s going to need a good long cure time to get nice and hard. I really should have left it for at least 48 hours before cutting, rather than my normal 24 hours, but I was in a hurry to get this post finished, and a picture uploaded onto to Amy’s challenge web page before the deadline, so that’s what I’m off to do now 😀

Thanks Amy for another great challenge!

Posted on — 12 Comments

Ooops…

I made this soap a couple of months ago and it’s been a surprisingly good seller, despite its rather ‘plain jane’ looks:

CP Soap - Serenity

Ordinarily I love my colours and swirls, and in my head this one was going to be a beautiful drop swirl design in shades of blue, a bit like this green one I made not so long ago…

Green drop

but it wasn’t to be…

I usually soap at room temperature. To that end I generally mix up my lye solution and melt my hard oils and butters during the baby’s midday nap, so that they’ve cooled down nicely by the time both kids are asleep in the evening. I also weigh out my liquid oils and add them to the melted oils as well – this starts the cooling process and also makes the ‘hard’ oils and butters less likely to re-solidify as they cool.

So on this occasion I prepped everything as normal, and once the bedtime routine was finished I eagerly set to work.  I combined the oils with the lye, added the essential oils (a blend of Bergamot, Patchouli, Orange and Ylang Ylang) then portioned out the batter and mixed in the colours (titanium dioxide, denim blue mica and ultramarine blue pigment). It was only after I’d poured all of the white portion into the mould that I realised that, even when I dropped in the two blues, I wouldn’t have anywhere near enough soap to fill the mould.

It only took a second or two for the penny to drop.   For some reason I had skipped a step at lunchtime, and hadn’t added the liquid oils to the melted oils.  My measured out liquid oils were still in a jug, put away safely to one side. Arrrgghhhhh! I couldn’t bear to waste a 3lb batch of soap, so did the only thing I could think of. All the mixed batter went back into a big bowl (oh the colours looked so pretty as I poured them in!) along with the liquid oils and I stick blended like crazy. The batter had originally behaved very well and traced beautifully (I’d had no indication that anything was amiss) so I had no idea whether it would work or not. I fully expected ricing, seizing or something equally frustrating but no, it all combined really well and I was able to pour my (by this stage) very plain, unicolour soap.

Despite everything, I’ve called it Serenity. The colour is very calming, and the fragrance blend is soothing and comforting. It’s funny how things turn out.